---
title: "Lovable to Mobile App: iOS & Android Without a Mac"
description: Convert your Lovable app into native iOS and Android apps with Capacitor — build in the cloud without a Mac, add the camera, and ship fixes over the air.
date:
created: 2026-06-26
updated: 2026-09-29
authors:
- djabif
categories:
- Capacitor
- Cloud
- Guides
links:
- Live Update Plugin: sdks/capacitor/live-update.md
faq: true
---
# Lovable to Mobile App: iOS & Android Without a Mac
You can convert a [Lovable](https://lovable.dev){:target="_blank"} app into native iOS and Android apps with Capacitor and build both in the cloud, so you need neither a Mac nor Xcode nor Android Studio. Lovable itself publishes to the web only, but the code it generates is a standard React + Vite project, which is exactly what [Capacitor](https://capacitorjs.com/){:target="_blank"} wraps into a native app. In this guide, we take a Lovable expense tracker called Spendly from the Lovable editor to a signed app on a real iPhone, add a native camera feature, set up the Apple Developer and Google Play accounts and signing certificates, and push a fix over the air with [Capawesome Cloud](https://capawesome.io/cloud/){:target="_blank"} Live Updates.
**No prior mobile experience required: every command and tool is explained as if you've never opened a terminal.**
This post has a companion video that walks through the entire process in real time, including the parts where things break and how to fix them:
**Key takeaways:**
- Lovable only publishes to the web, but its code is a normal web app, and Capacitor turns a web app into iOS and Android apps without rewriting it.
- You don't need a Mac, Xcode or Android Studio: Capawesome Cloud builds the iOS and Android apps for you in 2–5 minutes, from Windows, Linux or macOS.
- Ask Lovable for a single-page app: new Lovable apps use server-side rendering by default since May 13, 2026, and a native app needs a plain static build.
- Once the app is on phones, small fixes go out over the air in minutes with Live Updates; only new native features like the camera need a new build and store review.
- Publishing costs $99 per year for Apple and $25 one-time for Google Play, and you can do the whole guide on the free 14-day Capawesome Cloud trial.
## What You'll Build
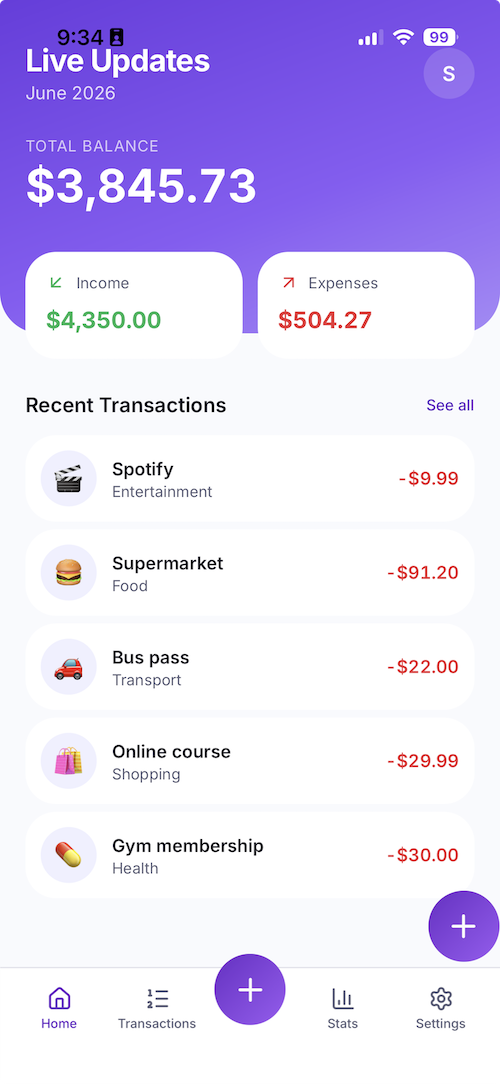
To keep things concrete, we'll use a sample app called Spendly, a mobile-first expense tracker built with Lovable. It lets you add expenses, see a running total, and (once we add the camera) snap a photo of a receipt when logging a transaction.
The steps apply to every Lovable app; Spendly is only the example.
By the end, you'll have:
- A native iOS and Android app built entirely in the cloud: no Mac, no Xcode, no Android Studio required
- The iOS app installed and running on a real iPhone device
- The Android app installed and running on a real Android device
- iOS and Android developer accounts configured to submit your app for review in the App Store and Google Play Store
- A working camera feature that only a real native app can offer
- Live Updates set up, so you can ship changes without going through app review every time, including a real fix we'll push over the air
## Check Your Lovable App Type
The kind of web app Lovable generates decides whether it can be wrapped into a native app as is, so check this before touching any code.
There are two kinds. A single-page app (SPA) is a self-contained bundle of files: when you build it, you get a folder with an `index.html` and everything the app needs, and it runs anywhere you put that folder. A server-rendered app (SSR) instead needs a web server to assemble each page while the user browses. Capacitor packs the app's files inside the phone app, and there is no web server inside a phone, so Capacitor needs the first kind.
For a long time, Lovable generated single-page apps by default. Since [May 13, 2026](https://docs.lovable.dev/changelog#tanstack-start-is-now-the-default-for-new-apps){:target="_blank"}, new Lovable apps are server-rendered by default (Lovable calls the setup TanStack Start). Server rendering is good for websites, because search engines read them more easily, but it gets in the way of a mobile app.
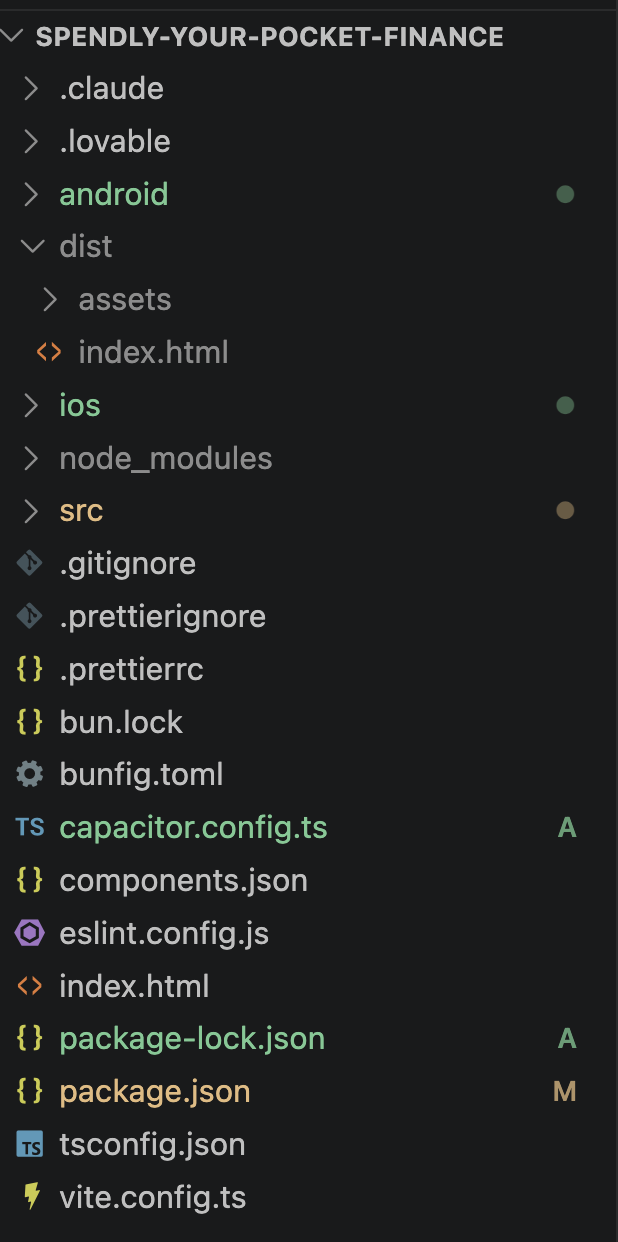
Spendly, the app in this guide, is a single-page app. When you build it, everything lands in a folder called `dist`, and that folder is what Capacitor wraps. If you're starting a new app today, tell Lovable you want a single-page app without server-side rendering, and you'll get the same `dist` folder we use here.
!!! note "Already have a server-rendered Lovable app?"
You don't have to start over. Ask Lovable to switch the project to a single-page app, or to make it produce a static build. The only thing Capacitor needs is the result: a folder with an `index.html` inside. Whatever that folder is called, that is the name you'll give Capacitor in Step 4.
## Build iOS and Android Apps Without a Mac
The traditional way to build a mobile app requires a Mac with Xcode for iOS and a fully configured Android Studio for Android. That's a huge amount of setup, and if you're on Windows or Linux, iOS is off the table.
We're going to skip almost all of that. [Capawesome Cloud Native Builds](https://capawesome.io/cloud/native-builds/){:target="_blank"} builds your iOS and Android apps on Apple computers in the cloud, signs them, and hands you back an installable app in a few minutes, from any operating system.
That changes the prerequisites dramatically:
- **You do *not* need Xcode or Android Studio** to build and ship your app. The cloud does it.
- **You *only* need them if you want a simulator**, a virtual phone that runs on your computer's screen. That's optional, and (fair warning) it's a lot more setup. We'll point out where it fits in, but the main path in this guide never touches them.
## Prerequisites
Here's what this takes before you start.
### Time
Plan for about 1–2 hours the first time, most of which is creating accounts and waiting on a cloud build or two. There are no giant local installs on the main path.
### What You Need
| Requirement | Details |
| ----------- | ------- |
| **A computer** | Mac, Windows, or Linux — **any OS works**, because the build happens in the cloud. |
| **A code editor** | [Visual Studio Code](https://code.visualstudio.com/){:target="_blank"} (free) is what we'll use. Any editor works. |
| [**Node.js**](https://nodejs.org/){:target="_blank"} | Version 20 or newer; pick the release labelled **LTS** (the stable one) — runs the build tools. |
| [**Git**](https://git-scm.com/){:target="_blank"} | Downloads your code from GitHub. |
| **A [Capawesome Cloud](https://console.cloud.capawesome.io){:target="_blank"} account** | Builds your apps in the cloud and pushes live updates. 14-day free trial. |
### Optional: Xcode and Android Studio
| Tool | Why you might want it |
| ---- | --------------------- |
| [**Xcode**](https://apps.apple.com/app/xcode/id497799835){:target="_blank"} (macOS only, ~15 GB) | Run the app in a virtual iPhone on your Mac. |
| [**Android Studio**](https://developer.android.com/studio){:target="_blank"} (~1 GB plus extras) | Run the app in a virtual Android phone. |
!!! tip "You can skip both"
The entire main path of this guide (building for iOS and Android and installing on a real iPhone) works without Xcode or Android Studio. Only install them if you specifically want a virtual phone on your computer, and know that it's a much heavier setup.
### App Store and Google Play Costs
| Item | Cost |
| ---- | ---- |
| [Apple Developer Program](https://developer.apple.com/programs/enroll/){:target="_blank"} | **$99/year** |
| [Google Play Console](https://play.google.com/console/signup){:target="_blank"} | **$25 one-time** |
| [Capawesome Cloud](https://capawesome.io/pricing/){:target="_blank"} | Starting at $19/month with a **14-day free trial** |
You need the Apple Developer account to install on a real iPhone and to publish. You can follow the whole build flow on the free trial.
### Install Node.js, Git, and VS Code
These are quick. Download [VS Code](https://code.visualstudio.com/){:target="_blank"} and install it. Then:
=== "macOS"
Install [Homebrew](https://brew.sh/){:target="_blank"}, then Node.js:
```bash
/bin/bash -c "$(curl -fsSL https://raw.githubusercontent.com/Homebrew/install/HEAD/install.sh)"
brew install node
```
Git usually comes pre-installed (`git --version` to check).
=== "Windows"
Download the **LTS** installer from [nodejs.org](https://nodejs.org/){:target="_blank"} and the installer from [git-scm.com](https://git-scm.com/){:target="_blank"}, and run both with the default options.
We'll type every command into VS Code's **integrated terminal**, the text window where you give your computer instructions. Open it with **Terminal → New Terminal** (or `` Ctrl + ` ``).
Confirm Node is ready:
```bash
node --version
npm --version
```
!!! warning "\"command not found\" after installing?"
Close the terminal completely and open a new one. Freshly installed tools often aren't recognized until you restart the terminal.
✅ **Success:** `node --version` and `npm --version` both return a version number.
## Step 1: Build Your App in Lovable
If you already have a Lovable app, skip to Step 2. If you're starting fresh, here's how Spendly was created.
[Lovable](https://lovable.dev){:target="_blank"} is an AI app builder. You describe the app you want in plain English, and it generates a working React app you can preview and refine in your browser, no coding required.
Here's the [exact prompt](../../assets/images/posts/convert-lovable-app-to-mobile-app/lovable-prompt.md) we used to generate Spendly.

!!! tip "Keep it a simple single-page app"
For the smoothest path to mobile, explicitly ask Lovable for a single-page app, like the prompt above does. New Lovable apps are server-rendered by default, and asking for a single-page app is what gets you the `dist` folder Capacitor wraps into a native app.
✅ **Success:** Your app previews and works inside the Lovable editor.
## Step 2: Export to GitHub
To work with your app on your own computer (and so Capawesome Cloud can build from it later), you first need the code in a GitHub repository. Lovable can push it there for you.
1. In the Lovable editor, click the **Upgrade** button in the top-right corner.
2. Click **Git** on the left menu and then the **Github** option.
3. Authorize Lovable (create a free GitHub account here if you don't have one).
4. Link your github account to this Lovable project.
5. Lovable will create a new repository and push your app into it automatically.

After it finishes, you'll have a repo at an address like `github.com/YOUR-USERNAME/spendly`.
If you got lost here, watch the video for the detailed step by step.
✅ **Success:** Visiting `github.com/YOUR-USERNAME/spendly` shows your app's code.
## Step 3: Run Your App Locally
Now download the code to your computer and make sure it runs. "Cloning" means copying the repository (the project on GitHub) onto your machine.
Open VS Code, start a terminal with **Terminal → New Terminal**, and run these one at a time (replace `YOUR-USERNAME`):
```bash
git clone https://github.com/YOUR-USERNAME/spendly.git
cd spendly
npm install
npm run dev
```
- `git clone …`: downloads your code into a new `spendly` folder.
- `cd spendly`: moves into that folder.
- `npm install`: downloads all the libraries your app depends on.
- `npm run dev`: runs the app on your computer so you can open it in a browser.
Then open the project in VS Code: **File → Open Folder**, select the `spendly` folder. Any new terminal you open is already inside it, so you can skip `cd spendly` from here on.
The terminal prints a local address. Open it in your browser. Lovable apps typically run on `http://localhost:8080`, but use whatever address your terminal shows (it may differ).

✅ **Success:** Spendly opens in your browser showing its UI.
Press `Ctrl + C` in the terminal to stop the app when you're ready to continue.
## Step 4: Add Capacitor to Your Lovable App
Capacitor is the bridge that turns your web app into a real native mobile app. It wraps your existing code in an iOS and Android shell, no rewrite needed.
Install Capacitor and set it up:
```bash
npm install @capacitor/core @capacitor/cli
npx cap init
```
`npx cap init` asks three questions. Answer them like this:
| Prompt | Answer | What it means |
| ------ | ------ | ------------- |
| **App name** | `Spendly` | The name shown under your app icon. |
| **App Package ID** | `com.spendly.app` | A unique ID for your app, written like a web address in reverse (your website's domain, then the app name). It can't be changed after you publish to the stores. |
| **Web assets directory** | `dist` | The folder your built app lands in. **For Lovable single-page apps this is `dist`.** |
This creates `capacitor.config.ts`:
```typescript title="capacitor.config.ts"
import type { CapacitorConfig } from '@capacitor/cli';
const config: CapacitorConfig = {
appId: 'com.spendly.app',
appName: 'Spendly',
webDir: 'dist',
};
export default config;
```
!!! tip "Pick a Package ID you own"
Your Package ID (Apple calls it the bundle ID, Google the application ID) must be unique across the App Store and Google Play, so two apps can never share one. In the companion video we picked one that was already taken and had to change it later, which means editing it in several files inside `ios/` and `android/` and rebuilding. Save yourself the detour: base it on a domain you own (e.g. `com.yourcompany.spendly`) from the start.
Now build your web app, add the iOS and Android projects, and copy the app into them:
```bash
npm run build
npm install @capacitor/ios @capacitor/android
npx cap add ios
npx cap add android
npx cap sync
```
- `npm run build` produces the `dist/` folder (Capacitor needs it before you add the platforms).
- `npx cap add ios` / `android` create the `ios/` and `android/` folders, each a complete native project.
- `npx cap sync` copies your built web app into both. You'll run it again after every change.
Your project now looks roughly like this:
```
spendly/
├── android/ ← native Android project
├── ios/ ← native iOS project
├── dist/ ← your built web app
├── src/ ← your Lovable app code
├── capacitor.config.ts
└── package.json
```
!!! note "No CocoaPods needed"
If you've followed older Capacitor tutorials, you may have seen a step to install a tool called CocoaPods for iOS. You don't need it. Since Capacitor 8, iOS dependencies are handled automatically by [Swift Package Manager](https://capawesome.io/blog/how-to-migrate-a-capacitor-app-to-spm/){:target="_blank"}, which comes with the project.
✅ **Success:** `ios/` and `android/` folders appear, and the terminal shows `Sync finished`.
## Step 5: Check `.gitignore`
Capawesome Cloud builds from your GitHub repository, which means the `ios/` and `android/` folders must be uploaded to GitHub. A `.gitignore` file lists what Git should leave out of the upload, and a common mistake is accidentally listing those folders there.
`npx cap add` already put a `.gitignore` inside each platform folder that leaves out only temporary build files, not the project itself, so you usually don't need to change anything. Confirm:
- The `.gitignore` in your project's main folder lists `node_modules` and `dist` (the cloud rebuilds `dist` itself, so it doesn't belong on GitHub). Lovable's default already does this.
- The `ios/` and `android/` folders are not listed. They need to be on GitHub.
✅ **Success:** Running `git status` shows the new `ios/` and `android/` folders as ready to upload (not ignored).
## Step 6: Commit and Push
Upload this milestone to GitHub so the cloud can build from it (`commit` records the change, `push` uploads it):
```bash
git add .
git commit -m "Add Capacitor and native iOS/Android platforms"
git push
```
✅ **Success:** Your GitHub repo now shows the `ios/` and `android/` folders.
## Step 7: Connect Capawesome Cloud
Everything in this section is done in the Capawesome Cloud Console, with no terminal needed.
1. **Sign up and create an organization.** Go to [console.cloud.capawesome.io](https://console.cloud.capawesome.io){:target="_blank"} and create an **organization** (your workspace). All plans include a **14-day free trial**.
2. **Create an app.** On the [Apps](https://console.cloud.capawesome.io/organizations/_/apps){:target="_blank"} page, select your organization, click **Create App**, give it a name (e.g. `Spendly`), and click **Create**. Open the app and copy its app ID. You'll paste it into your config when we set up Live Updates.
3. **Connect your GitHub repository.** Open the [Git](https://console.cloud.capawesome.io/apps/_/git){:target="_blank"} page for your app.
- Under **Git Providers**, select **GitHub** and click **Connect** to authorize access.
- Under **Git Repositories**, choose the repository owner, select your `spendly` repo, and click **Save**.
For the full connection flow and permissions, see the [GitHub integration docs](https://capawesome.io/docs/cloud/integrations/github/){:target="_blank"}.
✅ **Success:** Your app in Capawesome Cloud shows your GitHub repo connected, and you have your app ID saved.
## Step 8: Create Developer Accounts
To install on a real iPhone and to publish, you need developer accounts. This is a one-time setup with real timelines. Start it early.
### Apple Developer Program: $99/year
Enroll at [developer.apple.com/programs/enroll](https://developer.apple.com/programs/enroll/){:target="_blank"} for $99 per year. Individual accounts are usually approved within two days. Registering as a company also needs a D-U-N-S number, a free business identifier from Dun & Bradstreet that takes about a week to get.
### Google Play Console: $25 one-time
Register at [play.google.com/console/signup](https://play.google.com/console/signup){:target="_blank"} for a one-time $25 fee. Identity verification usually completes within a few hours.
Full walkthrough: [How to Create Your Apple Developer and Google Play Developer Accounts](./how-to-create-apple-developer-and-google-play-accounts.md).
✅ **Success:** Your Apple Developer account is active (and Google Play, if you're targeting Android).
## Step 9: Generate Signing Certificates
Apple and Google only accept signed apps, and iOS won't install an unsigned build on a real device either. Signing is a digital stamp that proves the app comes from you, and each platform has its own files for it:
- **iOS:** a certificate (the stamp itself) plus a provisioning profile (a list of which app, and which devices, that stamp may be used for). You need one pair for installing on your own iPhone (called *development*) and one pair for TestFlight and the App Store (called *distribution*). Both are created the same way.
- **Android:** a single keystore file that holds the stamp.
This is where most first-timers get stuck, but you can create everything in your browser, no Xcode or Android Studio required:
- **[iOS Certificate Generator](https://capawesome.io/tools/ios-certificate-generator/){:target="_blank"}**: creates your iOS certificate.
- **[Android Keystore Generator](https://capawesome.io/tools/android-keystore-generator/){:target="_blank"}**: creates your keystore file. Store it somewhere safe; you'll reuse it for every release, and Google Play won't accept updates signed with a different one.
Then upload them to Capawesome Cloud once, in the Console:
1. Open your app and go to the **Certificates** page.
2. Click **Create Certificate**, choose the platform, and upload the files:
- **iOS:** your `.p12` certificate (with its password) and your `.mobileprovision` provisioning profile.
- **Android:** your keystore file (with its keystore password, key alias, and key password).
3. Give it a recognizable name (e.g. `Production iOS Certificate`) and save.
Every future build picks the certificate up automatically, so you store nothing on your machine.
Step-by-step guides:
- [iOS signing certificates](https://capawesome.io/docs/cloud/native-builds/certificates/ios/){:target="_blank"}
- [Android signing certificates](https://capawesome.io/docs/cloud/native-builds/certificates/android/){:target="_blank"}
- [iOS Certificates and Provisioning Profiles Explained](./ios-certificates-and-provisioning-profiles-explained.md).
Remember that in the video this is shown step by step.
!!! tip "To install on your own iPhone"
Every iPhone has a unique identifier called a UDID. Look yours up with the free [iOS UDID Finder](https://capawesome.io/tools/ios-udid-finder/){:target="_blank"}, register it in your Apple Developer account, and include it in the development provisioning profile. That lets you install a development build directly on your phone. The easiest alternative is TestFlight, set up in Step 12.
✅ **Success:** Your certificates are uploaded to Capawesome Cloud.
## Step 10: Build Your Native App in the Cloud
Start a cloud build straight from the connected repository, all from the Console:
1. Open your app and go to the **Builds** page.
2. Click **Build from Git**.
3. Select your **Git reference** (the `main` branch, which is the version of your code the cloud should build), the **Platform** (iOS or Android), and the **Build Type**:
- **iOS → Development** (signed with your iOS *development* certificate, with your iPhone included in the provisioning profile): to install directly on your own device.
- **iOS → App Store** (signed with your iOS *distribution* certificate): for TestFlight and the App Store (you can't install this one straight onto a device).
- **Android → Release** (signed with your Android keystore): for Google Play. For a quick test on any Android device, **Android → Debug** needs no certificate.
4. Pick the matching **certificate**, then click **Build**.

Builds typically finish in 2–5 minutes. When a build fails, the Console's [Ask AI](https://capawesome.io/docs/cloud/assist/){:target="_blank"} explains the cause and a fix in plain English.
!!! note "Want a free, unsigned build to try first?"
On the **Build Type** dropdown, choose **iOS Simulator** or **Android Debug**. Neither needs a certificate. The iOS one only runs in a virtual iPhone, and the Android one installs on any Android phone, so they're a good first end-to-end test. Full reference: [Getting Started with Native Builds](https://capawesome.io/docs/cloud/native-builds/setup/){:target="_blank"}.
Watch the full Console walkthrough for each platform:
=== "iOS"
Simulator build and signed build:
=== "Android"
Full workflow from Git to a downloadable app file:
✅ **Success:** Your build completes in the Console with a downloadable app file (an IPA for iOS, an APK or AAB for Android).
## Step 11: Install the App on Your iPhone
Time to hold Spendly in your hand. The simplest paths, all without Xcode:
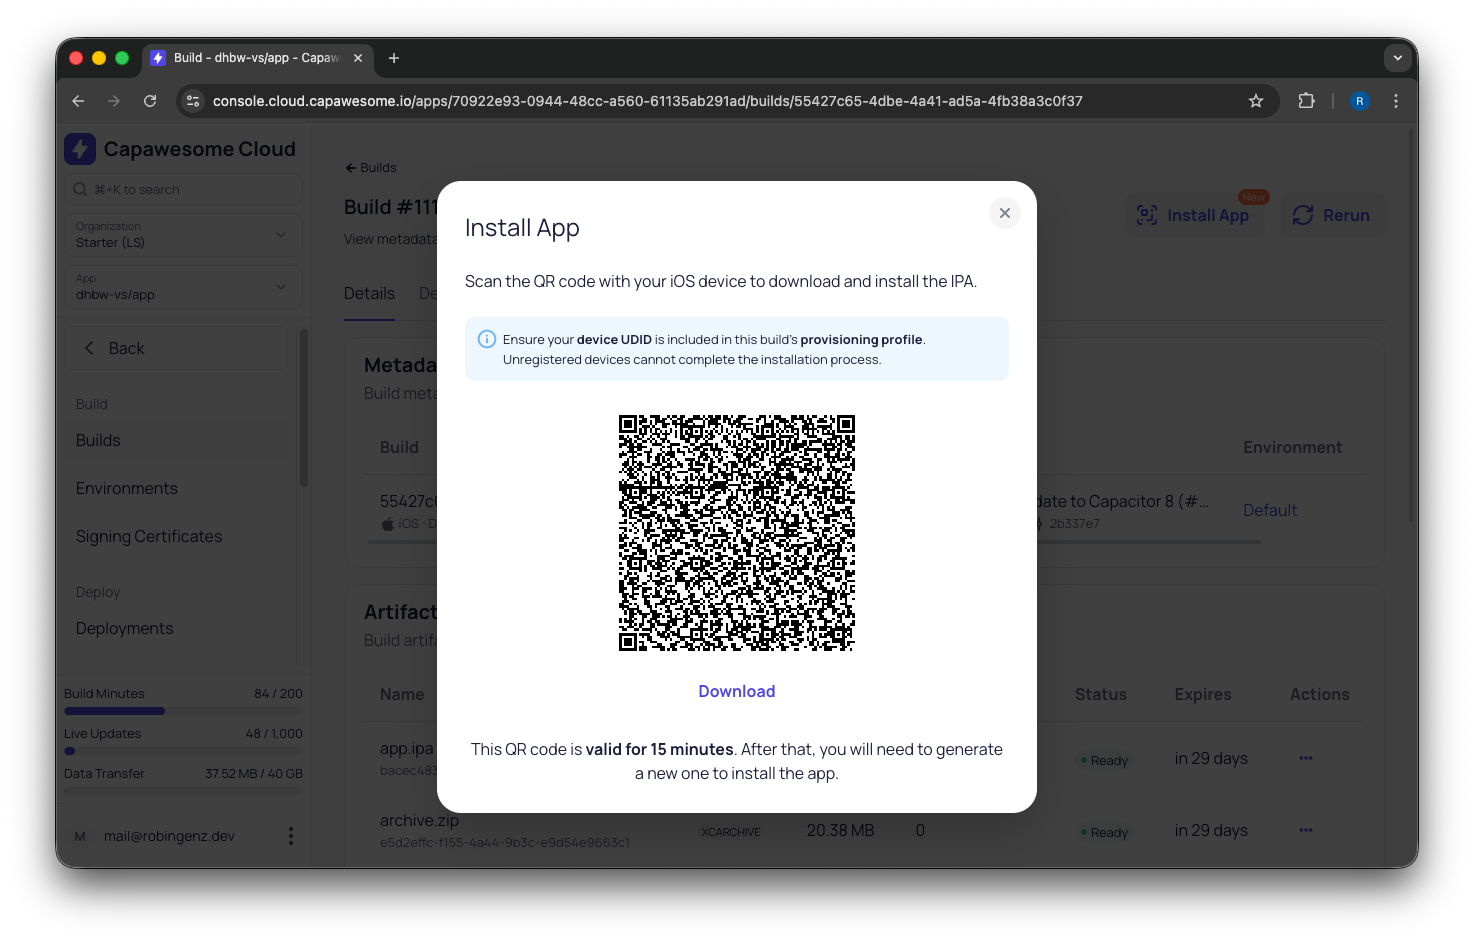
- **TestFlight (iOS):** push the build to TestFlight from Capawesome Cloud [App Store Publishing](https://capawesome.io/cloud/app-store-publishing/){:target="_blank"}, then install it from the TestFlight app on your iPhone. Internal testers don't wait for review.
- **Direct install:** install a development build straight onto a registered device from the Capawesome Cloud Console.
- **Google Play Internal Testing (Android):** share a link and testers install from the Play Store immediately, no review.
Full guide: [How to Distribute iOS and Android Apps to Testers](./how-to-distribute-ios-and-android-apps-to-testers.md). Console walkthrough:
!!! tip "Prefer a local simulator/emulator? (the heavier path)"
If you'd rather test in a virtual phone on your computer, you *can* install [Xcode](https://apps.apple.com/app/xcode/id497799835){:target="_blank"} (Mac only) and/or [Android Studio](https://developer.android.com/studio){:target="_blank"}, then run `npx cap open ios` / `npx cap open android` and press the Run button. Be warned: these are large downloads and a lot more configuration. The cloud + real-device path above is faster and works on any OS, which is why it's our main recommendation.
✅ **Success:** Spendly launches on your iPhone.
## Step 12: Deploy to Testers
Installing on your own phone is great, but to get the app to other testers you send it to a store destination: TestFlight on iOS or a Google Play testing track on Android. You set the destination up once in the Console and then deploy builds to it.
!!! info "This is walked through end-to-end in the companion video"
Creating both destinations involves a fair amount of clicking through Apple and Google's consoles. The [companion video](https://youtu.be/_5l-wiVYkVY){:target="_blank"} demonstrates the whole flow in real time, including the credentials, a couple of errors, and the fixes. This section is the written map; the linked docs below have the click-by-click detail.
The two-step pattern is the same for both platforms:
1. **Create a store destination** (the target + its credentials).
2. **Create a deployment** of a signed build to that destination.
### TestFlight (iOS)
Create an **Apple App Store** destination on the **Destinations** page of your app. Using the `Apple ID + Password` method, you'll provide:
- **Team ID**: from your Apple Developer Membership details.
- **Apple App ID**: the *Apple ID* property from the **App Information** section in App Store Connect (create the app there first, using your registered bundle ID).
- **Apple ID** + an **app-specific password**: a separate password Apple lets you create for tools like this one, on your [Apple ID account page](https://appleid.apple.com){:target="_blank"}.
Then create an **iOS → App Store** build signed with your distribution certificate and deploy it to that destination. Submissions are uploaded to TestFlight automatically. (You can also tick the deploy option on the build itself so a successful build ships to TestFlight in one go.)
Full detail: [Apple App Store & TestFlight Destination](https://capawesome.io/docs/cloud/app-store-publishing/destinations/apple-app-store/){:target="_blank"}.
### Google Play Internal Testing (Android)
Create a **Google Play Store** destination with:
- **Track**: `Internal` for internal testing.
- **Package Name**: your Android application ID (the same bundle ID).
- **Release Status**: `Draft` for the very first release (lets you finish setup in the console before it goes live).
- **JSON Key File**: a file that lets Capawesome Cloud upload to Google Play on your behalf. You create it in the Google Cloud Console as a "service account", then invite that account as a user in the Google Play Console and give it release permissions.
Then create an **Android → Release** build (Google Play rejects **Debug** builds) and deploy it to the destination. It appears under **Testing → Internal testing** in the Google Play Console, where you add tester emails.
Full detail: [Google Play Store Destination](https://capawesome.io/docs/cloud/app-store-publishing/destinations/google-play-store/){:target="_blank"}.
For the bigger picture (automatic submissions after a build, all tracks, and Firebase App Distribution), see [Getting Started with App Store Publishing](https://capawesome.io/docs/cloud/app-store-publishing/setup/){:target="_blank"} and our [How to Distribute iOS and Android Apps to Testers](./how-to-distribute-ios-and-android-apps-to-testers.md) guide.
✅ **Success:** Your build is live on TestFlight and/or the Google Play Internal track, and your testers have been invited.
## Step 13: Add a Native Feature: The Camera
A Capacitor plugin is a small add-on that lets your app's code use a real phone feature: camera, fingerprint or face unlock, location, and [50+ more](https://capawesome.io/docs/sdks/capacitor/){:target="_blank"}. This is what separates a real native app from a website in a wrapper.
We'll add the [Camera plugin](https://capacitorjs.com/docs/apis/camera){:target="_blank"} so users can photograph a receipt when adding an expense. If you later want to crop that receipt photo or shrink it before upload, [How to Take and Edit Photos in a Capacitor App](./how-to-take-and-edit-photos-in-a-capacitor-app.md) covers the plugins for that.
```bash
npm install @capacitor/camera && npx cap sync
```
### Declare Camera Usage
Both platforms require you to declare *why* your app uses the camera, or it crashes when the camera opens. You only do this once.
**iOS**: open `ios/App/App/Info.plist` and add inside the top-level ``:
```xml title="ios/App/App/Info.plist"
NSCameraUsageDescriptionSpendly uses the camera to let you photograph receipts.
```
**Android**: open `android/app/src/main/AndroidManifest.xml` and add inside the `` tag:
```xml title="android/app/src/main/AndroidManifest.xml"
```
### Use the Camera in Your App
Open the file that holds your "Add Transaction" form (it lives somewhere under `src/`; ask Lovable which file if you're unsure), and add this function plus a button:
```tsx
import { Camera, CameraResultType } from '@capacitor/camera';
async function takePhoto() {
const photo = await Camera.getPhoto({
quality: 90,
resultType: CameraResultType.Uri,
});
// photo.webPath is a URL you can show in an tag
return photo.webPath;
}
```
```tsx
```
!!! tip "Capacitor handles the permission dialog"
You don't write any code to ask for camera access. The first time a user taps the button, Capacitor shows the system "Allow camera access?" prompt, using the message you wrote in `Info.plist`.
✅ **Success:** Your code calls the Camera plugin and the project syncs without errors.
!!! tip "Hundreds more plugins, including Capawesome Insiders SDKs"
The camera is one example. Capawesome maintains a large library of [free, open-source Capacitor plugins](https://capawesome.io/docs/sdks/capacitor/){:target="_blank"}, and for more advanced needs there's [Capawesome Insiders](https://capawesome.io/insiders/){:target="_blank"}: premium, production-ready SDKs built and maintained by official Ionic Developer Experts, with priority support. Insiders covers native features like [NFC](https://capawesome.io/docs/sdks/capacitor/nfc/){:target="_blank"}, [Biometrics](https://capawesome.io/docs/sdks/capacitor/biometrics/){:target="_blank"}, [Bluetooth Low Energy](https://capawesome.io/docs/sdks/capacitor/bluetooth-low-energy/){:target="_blank"}, and [more](https://capawesome.io/docs/insiders/){:target="_blank"}. Most Capawesome Cloud plans already include a couple of Insider SDKs.
## Step 14: Add Live Updates (OTA)
Normally, every change to a native app (even a one-word typo fix) has to go through app store review, which can take days. [Capawesome Cloud Live Updates](https://capawesome.io/cloud/live-updates/){:target="_blank"} let you push changes to the web part of your app (the screens, styling, logic and images Lovable generated) over the air, straight to users' devices in minutes, with no review required.
!!! note "Add the plugin in your first release"
Adding a plugin requires a fresh native build and another store review. So install Live Updates now, before you have updates to ship. That way you're never stuck waiting on review when you need to push a fix. (We'll use exactly this capability in Step 16.)
Install and configure the plugin:
```bash
npm install @capawesome/capacitor-live-update@latest
npx cap sync
```
Add the plugin settings to `capacitor.config.ts`, pasting in the app ID you copied in Step 7:
```typescript title="capacitor.config.ts"
import type { CapacitorConfig } from '@capacitor/cli';
const config: CapacitorConfig = {
appId: 'com.spendly.app',
appName: 'Spendly',
webDir: 'dist',
plugins: {
LiveUpdate: {
appId: '00000000-0000-0000-0000-000000000000',
autoUpdateStrategy: 'background',
readyTimeout: 10000,
autoBlockRolledBackBundles: true,
},
},
};
export default config;
```
- `autoUpdateStrategy: 'background'`: the app checks for updates when it opens, downloads them silently, and applies them the next time it opens. No prompts, no extra code.
- `readyTimeout` + `autoBlockRolledBackBundles`: safety nets that [automatically undo](https://capawesome.io/docs/cloud/live-updates/rollbacks/){:target="_blank"} a broken update, so a bad release can't leave users with an app that won't start.
A quick word on channels: a [channel](https://capawesome.io/docs/cloud/live-updates/channels/){:target="_blank"} is like a named mailbox for updates. Each installed app checks one mailbox, and you can use different ones for different audiences, for example `staging` for testers and `production` for everyone else. We're not setting one here, so the plugin uses your app's built-in `default` channel, which is where we'll deliver the update in Step 16.
The safety net needs your app to report "I started fine" as early as possible, which is what `ready()` does. In a Lovable app, open `src/main.tsx` and add near the top:
```tsx title="src/main.tsx"
import { LiveUpdate } from '@capawesome/capacitor-live-update';
void LiveUpdate.ready();
```
Then sync:
```bash
npx cap sync
```
✅ **Success:** The Live Update plugin is installed, configured with your app ID, and `ready()` is called on startup.
## Step 15: Rebuild the Native App in the Cloud
We added two plugins (Live Update and Camera) and a new permission. Those are native changes, so they need a fresh native build. A Live Update alone can't deliver them. First commit and push your changes:
```bash
git add .
git commit -m "Add Live Updates and Camera plugin"
git push
```
Then trigger a new build exactly like in Step 10: in the Console, open the **Builds** page → **Build from Git** → select `main`, your platform, the signed build type, and your certificate → **Build**.
Install this new build on your iPhone (TestFlight or direct install, as in Step 11). Your phone now runs a version of the app that includes the camera and can receive live updates.
✅ **Success:** The updated build with the camera installs and runs on your iPhone.
## Step 16: Fix the Status Bar via Live Update
Look closely at the app on your iPhone. There's a good chance the very top, your header or title, is tucked underneath the status bar (the clock and battery), or behind the notch. The bottom looks fine; the top is cut off.
This happens because Capacitor draws your app across the *entire* screen, including behind the status bar and the notch. The part of the screen those cover is called the safe area, and the phone tells your app how big it is through built-in CSS values named `env(safe-area-inset-top)`, `-bottom`, `-left` and `-right`. Your app has to add that much space itself.
!!! note "Why the bottom often looks right but the top doesn't"
Many Lovable apps already add `env(safe-area-inset-bottom)` at the bottom, so that side is handled. The top headers usually use a fixed amount of space (like `pt-6`) that ignores the safe area, so they slip under the status bar.
First, confirm the `` line in `index.html` includes `viewport-fit=cover` (Lovable apps usually already do; it's what switches the safe-area values on):
```html title="index.html"
```
Then add the safe-area space to the top of each page header. The trick is `max()`: keep the original spacing in the browser, and grow to the safe area on phones that need it:
```diff
-
+
```
Do this for each screen's top header. If a header has a colored or gradient background, this is exactly what you want: the background still fills the screen edge-to-edge, and only the *content* shifts down below the status bar.
!!! tip "Let Lovable do the edit"
You can ask Lovable: *"The app content runs under the status bar at the top on mobile. Add `env(safe-area-inset-top)` to the top padding of each page header using `max()`, keeping the existing padding as the minimum."*
### Ship the Fix with a Web Build
This fix only touches styling (no new plugin, nothing native), so we can push it straight to the installed app without a new native build or a trip through app review.
A live update is created with a **Web Build**. It works exactly like the iOS and Android builds you already did, except you pick **Web** as the platform. It's the same Builds page, fully in the Console, no terminal.
First, push your fix to GitHub so the cloud can build from it:
```bash
git add .
git commit -m "Fix top safe area"
git push
```
Then, in the Console:
1. Open the **Builds** page and click **Build from Git**.
2. Select your `main` branch and choose **Web** as the **Platform**, then click **Build**. (Web builds run your `npm run build` in the cloud in a few seconds.)
3. When it finishes, **deploy** that build to your app's `default` channel. Since we didn't set up a custom channel in Step 14, that's the one your installed app checks automatically.
You can watch it on the [Deployments](https://console.cloud.capawesome.io/apps/_/deployments){:target="_blank"} page, and roll back to a previous build from there anytime.
!!! note "Channels are how the right update reaches the right app"
A web build is deployed to a channel, and each installed app checks one channel. Every app comes with a `default` channel, which is what we use here. Once you have real users on several app versions, [versioned channels](https://capawesome.io/docs/cloud/live-updates/channels/#versioned-channels){:target="_blank"} make sure each update only reaches the app versions it [works with](https://capawesome.io/docs/cloud/live-updates/binary-compatible-changes/){:target="_blank"}. (See also [Web Builds](./announcing-capawesome-cloud-web-builds.md).)
Watch the full Live Updates Console walkthrough:
Full guides:
- [Getting Started with Live Updates](https://capawesome.io/docs/cloud/live-updates/setup/){:target="_blank"}
- [Capacitor Live Updates: The Complete Guide to OTA Updates](./capacitor-live-updates-guide.md)
Now force-close Spendly on your iPhone and reopen it.
!!! note "Force-close to trigger the update during testing"
With the background setting from Step 14, the app checks for updates when it opens (and when you come back to it, if the last check was over 15 minutes ago). While testing, fully close and reopen the app, wait ~15–30 seconds, then open it once more to see the change applied.
✅ **Success:** The header now sits below the status bar, fixed on your device without rebuilding the native app or going through review.
## Step 17: Prepare Your App Store Listing
Your app is built, installable, and you can already push instant updates. What remains before it goes live on the public stores is mostly paperwork. Apple and Google both want a complete listing before you can submit: an icon, screenshots (Apple insists on iPhone 6.9-inch captures), a name and description, a privacy policy URL even for free apps, an age rating, and the data-collection disclosures. [How to Prepare Your App Store Listing](./how-to-prepare-your-app-store-listing.md) walks through each item with the exact sizes.
### What's Left to Submit
This guide got you all the way to a signed, installable app with live updates wired in. To publish, you still need to:
1. **Complete Google Play's closed testing period** (personal accounts created after Nov 13, 2023): at least 12 testers for 14 consecutive days before you can request production access. iOS has no equivalent. [Details here](./11-steps-to-get-your-web-app-on-the-app-store.md#step-8-complete-google-plays-closed-testing-period).
2. **Submit for review.** In App Store Connect, assign your build and click Submit for Review (Apple review: ~3–5 days). For Google Play, apply for production access after closed testing (review: ~3–7 days). Capawesome Cloud [App Store Publishing](https://capawesome.io/cloud/app-store-publishing/){:target="_blank"} can automate both submissions with one click, or automatically on every successful build via [Automations](https://capawesome.io/docs/cloud/automations/setup/){:target="_blank"}.
Our companion guide covers this end of the journey in full detail: [Convert a Web App to a Mobile App in 11 Steps](./11-steps-to-get-your-web-app-on-the-app-store.md).
## Common Errors and Fixes
Setting this up for the first time almost always involves a little back-and-forth. Several of these came up live in the companion video, which is a good thing, because you get to see exactly how to fix them. Here are the ones you're most likely to hit:
- **`Could not find the web assets directory: ./dist`** (when running `npx cap add` or `npx cap sync`). You ran the command before building. Run `npm run build` first so the `dist/` folder exists, then retry. If your app builds into a folder with a different name, make sure `webDir` in `capacitor.config.ts` matches it.
- **"This App ID … is not available" / bundle ID already taken** (registering the App ID in Apple). Bundle IDs are globally unique. Pick a reverse-domain ID based on a domain you control (e.g. `com.yourcompany.spendly`).
- **iOS build fails after changing the bundle ID.** If you change the bundle ID in Apple but not in your project (or vice versa), they no longer match and the build fails. The bundle ID in your native project must equal the App ID registered in Apple. Find-and-replace it across `ios/` and `android/`, commit, and rebuild.
- **"Google Play Android Developer API has not been used in project … or it is disabled."** Open the link in the error to the Google Cloud Console, enable the API, wait a moment, and re-run the deployment.
- **"APK has been signed in debug mode."** Google Play won't accept a debug-signed build. Create an **Android → Release** build signed with your keystore, then deploy that.
- **Deployment rejected: version already exists.** Both stores reject a build whose version number they already have. Increase your app's version number, create a new build, and deploy that one. To have the number increase on its own, see [Introducing CapVer](https://capawesome.io/blog/introducing-capver/){:target="_blank"}.
When a **build** fails, the Console keeps full logs, and [Ask AI](https://capawesome.io/docs/cloud/assist/){:target="_blank"} turns the error into a plain-English cause and fix. For deployment issues, see [App Store Publishing Troubleshooting](https://capawesome.io/docs/cloud/app-store-publishing/troubleshooting/){:target="_blank"} and [Live Updates Troubleshooting](https://capawesome.io/docs/cloud/live-updates/troubleshooting/){:target="_blank"}.
## FAQ
### Can Lovable publish my app to the App Store or Google Play directly?
No. Lovable publishes to the web only, as its own [mobile FAQ](https://lovable.dev/faq/capabilities/mobile/publish-app-store-google-play){:target="_blank"} states. To reach the stores, export the code to GitHub, add Capacitor, and build the native iOS and Android apps yourself or in the cloud, which is what this guide does. Your Lovable project stays the single codebase; the native shell is generated around it.
### My Lovable app is server-rendered. Do I need to rebuild it as a single-page app?
Not from scratch, but Capacitor does need a folder with an `index.html` that contains the whole app, and a server-rendered app doesn't produce one. Ask Lovable to switch the existing project to a single-page app (or to a static build); it keeps your screens and logic and only changes how the app is packaged. Then point `webDir` at the folder it produces.
### Why does my build fail with "Could not find the web assets directory: ./dist"?
You ran `npx cap add` or `npx cap sync` before building the web app, so the `dist/` folder Capacitor expects doesn't exist yet. Run `npm run build` first, then retry. Double-check that `webDir` in `capacitor.config.ts` matches the folder your build actually produces.
### Do I have to install Xcode or Android Studio to follow this guide?
No, for the main path. The entire build-and-install flow (cloud builds, TestFlight, direct device installs) works without either, since Capawesome Cloud builds on its own Apple computers. Xcode and Android Studio are only needed if you want a virtual phone on your own computer, which the guide calls out as optional and considerably heavier to set up.
### If I add the Camera plugin after my first native build, can I ship it as a Live Update?
No. Adding a plugin changes the native part of the app, so it needs a fresh native build and a new store submission; a Live Update can only change the web part. That is why the guide installs the Live Update plugin in the very first release: by the time you need to ship a fix, the app already knows how to receive it.
### Why does my app's header get hidden under the status bar, but the bottom of the screen looks fine?
Because most Lovable-generated apps already add safe-area space at the bottom with `env(safe-area-inset-bottom)`, but top headers typically use a fixed amount of space that ignores the status bar. Since Capacitor draws your app across the whole screen, the header needs the same treatment on top (`max()` combined with `env(safe-area-inset-top)`) that the bottom likely already has.
## Related Posts
- [Announcing Open Source AI Agent Skills for Capacitor](./announcing-open-source-ai-agent-skills-for-capacitor.md)
- [How to Use AI Agents in Capacitor App Development](./how-to-use-ai-agents-in-capacitor-app-development.md)
## Try Capawesome Cloud
Build your Lovable app for iOS and Android in the cloud, push fixes over the air, and submit to the stores from one place, on any operating system.
[Try Capawesome Cloud Free](https://capawesome.io){ .md-button .md-button--primary }
## Final Thoughts
If your Lovable app is already a single-page app, start at Step 4 and let the cloud handle the native side. If it is server-rendered, switch it to a single-page app first, because nothing else in this guide works until it does.
Add the Live Update plugin to your very first release, even with nothing to ship yet. Every other feature you can add with a new native build, but a missing Live Update plugin means another store review before you can push your first over-the-air fix.
From here, finish publishing with the store listing, Google's closed testing and the submission itself in [Convert a Web App to a Mobile App in 11 Steps](./11-steps-to-get-your-web-app-on-the-app-store.md), let [Automations](https://capawesome.io/docs/cloud/automations/setup/){:target="_blank"} turn every `git push` into a build, a store submission and a live update, and browse the [Capacitor plugin library](https://capawesome.io/docs/sdks/capacitor/){:target="_blank"} for biometrics, push notifications and geolocation.
Got stuck somewhere? The [Capawesome Discord server](https://discord.gg/VCXxSVjefW){:target="_blank"} is active and friendly, so drop your question there. And subscribe to the [Capawesome newsletter](https://capawesome.io/newsletter/){:target="_blank"} to stay up to date on new plugins, Cloud features, and guides like this one.