---
title: How to Build and Deploy iOS Apps Without Owning a Mac
description: Build and deploy iOS apps without owning a Mac. Use Capawesome Cloud's cloud-based macOS environment to build Capacitor apps from Windows, Linux, or macOS.
date:
created: 2026-04-07
updated: 2026-07-17
authors:
- robingenz
categories:
- Guides
faq: true
---
# How to Build and Deploy iOS Apps Without Owning a Mac
If you're building a Capacitor app on Windows or Linux, you've probably hit the same wall every cross-platform developer eventually runs into: shipping to the App Store requires macOS. Xcode, `codesign`, and the iOS simulator all live exclusively on Apple hardware, and Apple isn't planning to change that any time soon. The good news is that you don't need a Mac on your desk to [build, sign, and ship an iOS app](https://capawesome.io/solutions/build-without-mac/){:target="_blank"}.
## Why iOS Development Requires a Mac
Apple's entire iOS toolchain (Xcode, the iOS Simulator, `xcodebuild`, `codesign`, and the provisioning system) only runs on macOS. There's no official Linux or Windows version, and there's no supported way to produce a real `.ipa` file outside of an Apple-controlled environment. For a Capacitor or Ionic developer who lives in VS Code on Windows or Ubuntu, that's a hard blocker the moment you want to ship to TestFlight or the App Store.
Fortunately, "you need macOS" doesn't have to mean "you need to buy a Mac." There are three realistic ways to get access to a macOS build environment, and they trade off cost, flexibility, and setup effort in very different ways.
## Three Ways to Build iOS Apps Without Owning a Mac
### Option 1: Buy a Mac
The most straightforward route is also the most expensive. A Mac mini or MacBook Air gives you a permanent local build machine, full control over your Xcode versions, and the ability to run the iOS Simulator for debugging. The catch is the upfront cost (often well over $1,000 once you factor in storage and RAM), the ongoing maintenance, and the fact that the machine sits idle most of the time. For a solo developer who only occasionally ships an iOS build, that's a lot of hardware to babysit.
### Option 2: Rent a Mac in the Cloud
Services like MacStadium and MacinCloud rent out real Mac hardware by the hour, day, or month. You SSH or VNC into a remote macOS instance and use it just like a local Mac. This avoids the upfront hardware cost and lets you scale up to faster machines when you need them. But you're still responsible for everything that happens inside the box: installing Xcode, managing certificates, writing build scripts, and keeping the environment in sync with your project.
### Option 3: Use a Mobile CI/CD Service
The third option is to skip the "raw Mac" entirely and use a purpose-built mobile CI/CD service such as [Capawesome Cloud](https://capawesome.io/){:target="_blank"}, Codemagic, or [Bitrise](https://capawesome.io/alternatives/bitrise/). Instead of renting a machine, you describe your build in a config file (or click a button in a web UI), and the service spins up a clean, pre-configured macOS environment, runs the build, signs it, and hands you back an `.ipa`. You never have to touch Xcode yourself.
A CI/CD service is great for producing builds, but it can't replace a local Mac for interactive debugging. If you need to step through code in the iOS Simulator or attach a debugger to a physical device, you'll still want a real Mac (owned or rented) for that part of the workflow. For everything else (TestFlight builds, App Store submissions, ad-hoc test builds for your QA team), a CI/CD service is usually the fastest and cheapest path.
## Building iOS Apps with Capawesome Cloud
[Capawesome Cloud](https://capawesome.io/){:target="_blank"} is a mobile CI/CD service built specifically for Capacitor and Ionic apps. Its [Native Builds](https://capawesome.io/cloud/native-builds/){:target="_blank"} feature spins up isolated macOS build environments on M4 Pro hardware, handles Xcode, signing, and provisioning for you, and produces ready-to-install iOS artifacts in around two and a half minutes on average. It supports every iOS build type (Simulator, Development, Ad Hoc, App Store, and Enterprise) and integrates with GitHub, GitLab, Bitbucket, and Azure DevOps, including self-hosted instances.
You don't need Xcode on your machine. You don't need a Mac on your network. You just need a way to tell Capawesome Cloud to start a build, and there are two of those.
## Two Ways to Trigger an iOS Build
### From the Console
The Console is the web-based interface for managing your apps and builds. It's the easiest way to get started, especially if you want to browse logs, monitor progress, or trigger builds from any device — including your phone.
The prerequisite is that the Git repository hosting your iOS project is connected to your app in Capawesome Cloud. Once that's done:
1. Open your app in the [Capawesome Cloud Console](https://console.cloud.capawesome.io){:target="_blank"}.
2. Go to the **Builds** page and click **Build from Git**.
3. Pick a Git reference (branch, tag, or commit), select **iOS** as the platform, and choose a build type.
4. Select a signing certificate with a matching provisioning profile.
5. Click **Build**.
Don't have an iOS signing certificate yet? You don't need a Mac to create one. The free [iOS Certificate Generator](https://capawesome.io/tools/ios-certificate-generator/){:target="_blank"} produces the Certificate Signing Request (CSR) and the final `.p12` certificate right in your browser, with no Keychain Access required, so you can generate the signing certificate and upload it to Capawesome Cloud entirely from Windows or Linux.
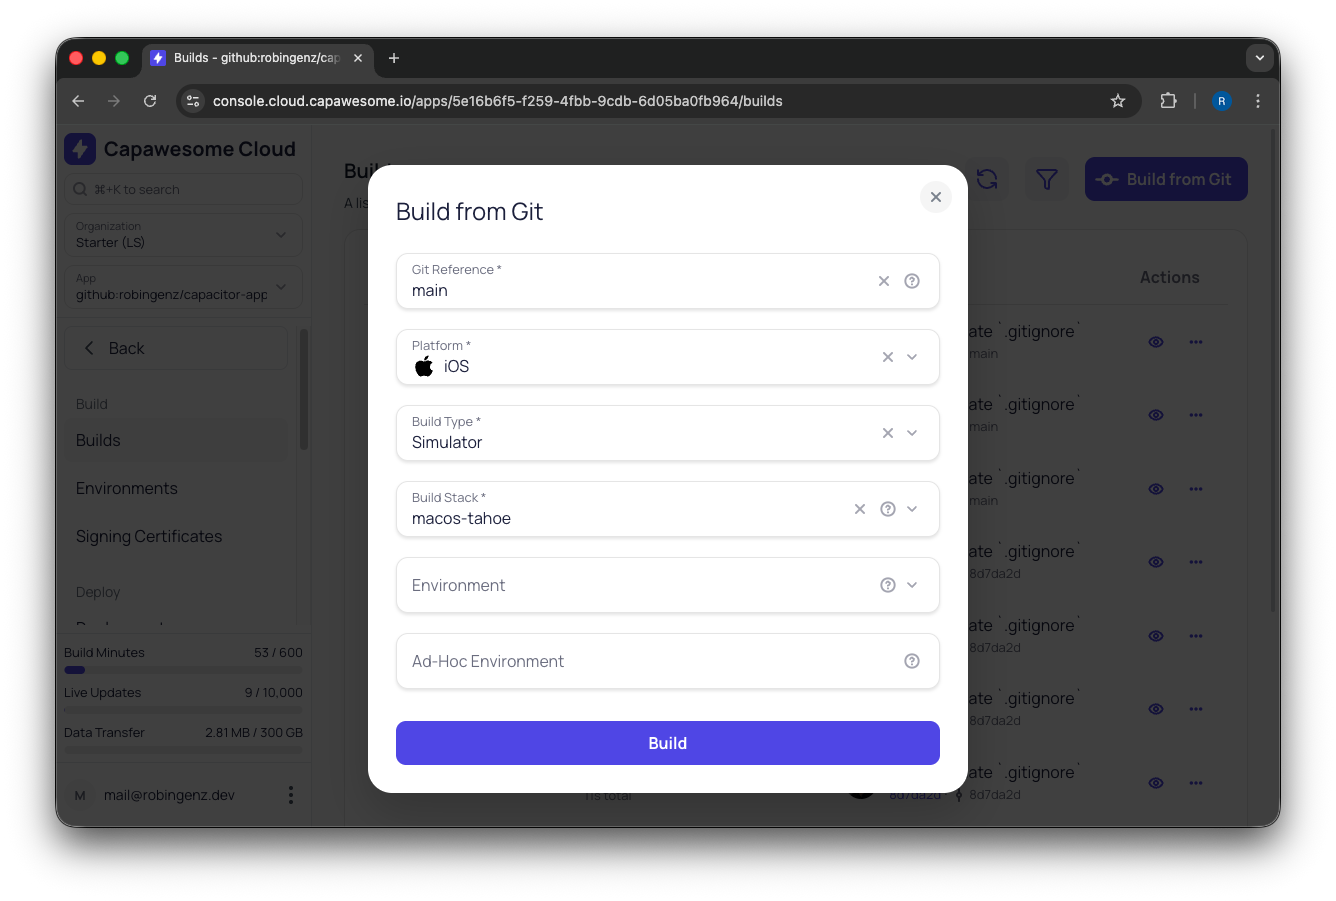
Trigger an iOS build directly from the Console
You can close the tab and come back later, or watch the live logs stream in. When the build finishes, you'll find the `.ipa` ready for download, or automatically uploaded to TestFlight if you've set up an [App Store Publishing destination](../../cloud/app-store-publishing/index.md). [Auto-Submit a Capacitor App to TestFlight and Google Play](./auto-submit-capacitor-app-to-testflight-and-google-play.md) covers that setup for both stores, including the tag automation that submits every release.
### From the CLI
If you'd rather stay in your terminal, or want to wire builds into your own CI/CD pipeline, the [Capawesome CLI](../../cloud/cli/index.md) can trigger the same builds with a single command. And unlike the Console, the CLI doesn't require a connected Git repository: you can upload a local project directly.
Build from a Git reference (when a repository is connected):
```bash
npx @capawesome/cli apps:builds:create \
--app-id \
--platform ios \
--git-ref
```
Or build directly from a local directory, no Git connection required:
```bash
npx @capawesome/cli apps:builds:create \
--app-id \
--platform ios \
--path
```
The `--path` option is also handy when you *do* have a repository connected but want to test a quick local change without committing and pushing it first. You get the same cloud-built `.ipa`, just based on your working copy.
To grab the build artifact as soon as the build finishes, add the `--ipa` flag (or `--apk` for Android builds). The CLI will download it directly to your machine when the job completes:
```bash
npx @capawesome/cli apps:builds:create \
--app-id \
--platform ios \
--git-ref main \
--ipa
```
That single command takes a Capacitor project on a Windows or Linux machine, builds it on a real Mac in the cloud, and drops the signed `.ipa` next to your project — no Xcode required.
## See It in Action
Here's a short walkthrough of what triggering an iOS build in Capawesome Cloud looks like:
If you want to go deeper into the full iOS pipeline, these videos may help you:
- [Connect Your GitHub Repository to Capawesome Cloud](https://www.youtube.com/watch?v=v95z7abLWd8){:target="_blank"}
- [Managing Signing Certificates and Provisioning Profiles in Capawesome Cloud](https://www.youtube.com/watch?v=tKt3NNcFiCM){:target="_blank"}
- [Upload iOS Builds to TestFlight Automatically with Capawesome Cloud](https://www.youtube.com/watch?v=6DY6kY8mUb8){:target="_blank"}
## FAQ
### Is renting a Mac in the cloud (MacStadium, MacinCloud) better than a CI/CD service?
It depends what you need it for. Renting a raw Mac gives you full manual control (you SSH or VNC in and use it exactly like a local machine), but you're still the one installing Xcode, managing certificates, and writing build scripts. A mobile CI/CD service like Capawesome Cloud skips that setup entirely: you point it at your project and it handles the macOS environment, signing, and build steps for you. The trade-off is control versus convenience, not price alone.
### Can a cloud build service replace my local Mac completely?
For producing builds, yes. For interactive debugging, no — stepping through code in the iOS Simulator or attaching a debugger to a physical device still needs a real macOS environment in front of you. A cloud build service handles TestFlight builds, App Store submissions, and QA test builds well, but it's not a substitute for a local Mac when you're actively debugging.
### Should I use the Console or the CLI to trigger builds?
Use the Console if you want to browse logs, monitor progress, or trigger a build from any device including your phone. It's the more approachable starting point. Use the CLI if you want to script builds into your own pipeline, or if you want to build from a local working copy without pushing to Git first via `--path`, which the Console doesn't support since it always builds from a connected Git reference.
### Can I test a local code change without committing and pushing it?
Yes, using the CLI's `--path` flag instead of `--git-ref`. This uploads your local working directory directly to Capawesome Cloud and builds it as-is, which is useful for verifying a quick fix works before you commit, without polluting your Git history with throwaway commits.
### What iOS build types are supported?
Simulator, Development, Ad Hoc, App Store, and Enterprise. Simulator builds skip signing entirely and are useful for a first smoke test; the others require a matching signing certificate and provisioning profile depending on where the build is headed (a registered test device, TestFlight, or full App Store release).
## Try It Yourself
If you've been putting off shipping your Capacitor app because you don't have a Mac sitting around, this is the easiest way to unblock yourself. Sign up for free, connect your repo (or just upload a folder), and have a signed iOS build in your hands in a few minutes.
[Try Capawesome Cloud Free](https://capawesome.io){ .md-button .md-button--primary }
## Final Thoughts
Start with a CI/CD service and add hardware only when a debugger forces you to. Connect your repository to Capawesome Cloud, trigger one iOS build from the Console, then move to the CLI once you want builds in a pipeline or straight from a local working copy. If you later need to step through code in the iOS Simulator or on a physical device, rent a Mac for that part of the workflow instead of buying one to run builds you no longer run locally.
If you want to go deeper on what Capawesome Cloud Native Builds can do under the hood, take a look at [Announcing Capawesome Cloud Native Builds](./announcing-capawesome-cloud-native-builds.md). This guide used a Capacitor project as the example; if your app is built with Cordova, [How to Build a Cordova iOS App Without a Mac](./build-cordova-ios-app-without-a-mac.md) walks through the same flow for a Cordova project.
Building without a Mac is just one piece of shipping a mobile app. If you're starting from a web app and want a step-by-step walkthrough of the entire process (accounts, certificates, builds, store listing, submission, and Live Updates), see [From Web App to App Store: The Complete Guide](./11-steps-to-get-your-web-app-on-the-app-store.md). For the broader picture on managed iOS CI/CD beyond just skipping the Mac, see [Managed iOS CI/CD in 2026 Without macOS or Pipelines](./ci-cd-for-ios-apps.md).
If you have questions or want to share what you're building, join us on the [Capawesome Discord server](https://discord.gg/VCXxSVjefW){:target="_blank"} or [subscribe to the Capawesome newsletter](https://capawesome.io/newsletter/){:target="_blank"} to keep up with what's new.
