---
title: "How to Sign & Build Capacitor Apps in the Cloud"
description: A guide to signing and building Capacitor apps in Capawesome Cloud, from uploading Android keystores and iOS certificates to automating every build.
date:
created: 2026-09-13
updated: 2026-09-13
authors:
- djabif
categories:
- Capacitor
- Cloud
- Guides
links:
- Set Up Signing Certificates: cloud/native-builds/certificates/index.md
- Trigger a Build: cloud/native-builds/builds.md
- Automations: cloud/automations/index.md
faq: true
---
# How to Sign & Build Capacitor Apps in the Cloud
A Capacitor cloud build signs and packages your app for Android or iOS without a local keychain, a Mac for iOS, or Android Studio installed. With Capawesome Cloud, you upload your Android keystore or iOS certificate to a [signing certificate](../../cloud/native-builds/certificates/index.md) once, and every build after that (manual or triggered by a Git push) is signed automatically. This guide walks through the exact fields Capawesome Cloud asks for, the equivalent CLI commands, and how to wire signing into an [automation](../../cloud/automations/index.md) so a push to `main` ships a signed build without you touching the Console again. It assumes your project is already a Capacitor app; if you're starting from a plain web app, [Convert a Web App to a Mobile App in 11 Steps](./11-steps-to-get-your-web-app-on-the-app-store.md) covers the wrapping part first and hands off to signing right here.
This walkthrough covers setting up a signing certificate in Capawesome Cloud end to end:
**Key takeaways:**
- Android builds are signed with a `.jks` or `.keystore` file; iOS builds need a `.p12` certificate plus one `.mobileprovision` profile per app target.
- Upload certificates through the Console at `console.cloud.capawesome.io/apps/_/certificates` or with `npx @capawesome/cli apps:certificates:create`.
- `apps:builds:create --certificate ""` triggers a one-off signed build, referencing the certificate by name, not by ID.
- `apps:automations:create --certificate ""` wires signing into every Git-triggered build automatically.
## Prepare your files
Before you upload anything, you need the signing material itself.
For Android, that's a Java keystore file (`.jks` or `.keystore`). If you already have one from a previous release, reuse it, since switching keystores on an app already in the Play Store breaks updates for existing users. If you're starting fresh, generate one with:
```bash
keytool -genkey -v -keystore my-release-key.jks -keyalg RSA -keysize 2048 -validity 10000 -alias my-key-alias
```
Or skip the terminal entirely with the [Android Keystore Generator](https://capawesome.io/tools/android-keystore-generator/){:target="_blank"}, which produces the same file in your browser.
For iOS, you need a `.p12` certificate (your signing identity, exported with its private key) and at least one `.mobileprovision` provisioning profile that matches your app's bundle ID and the certificate's type (development or distribution). If you're not sure how these two files relate to each other, [iOS Certificates and Provisioning Profiles Explained](./ios-certificates-and-provisioning-profiles-explained.md) covers the concepts in detail. Generating a `.p12` normally means opening Keychain Access, which only runs on macOS. The [iOS Certificate Generator](https://capawesome.io/tools/ios-certificate-generator/){:target="_blank"} handles the whole chain, CSR included, from any browser, so a Windows or Linux laptop is enough to get a working `.p12` for Capawesome Cloud.
## Add an Android certificate
Open the Console at `console.cloud.capawesome.io/apps/_/certificates` and select your app, then create a new certificate with these fields:
- **Name**: a descriptive label, for example "Production Android Key".
- **Platform**: `Android`.
- **Keystore File**: your `.jks` or `.keystore` file.
- **Keystore password**: the password for the keystore file.
- **Key alias**: the alias of the signing key inside the keystore.
- **Key password**: the password for that key alias (often the same as the keystore password, depending on how the keystore was created).

Uploading an Android keystore as a new signing certificate
The same fields map directly to a CLI call, if you'd rather script the setup:
```bash
npx @capawesome/cli apps:certificates:create \
--app-id \
--platform android \
--name "Production Android Key" \
--file ./my-release-key.jks \
--password \
--key-alias my-key-alias \
--key-password
```
## Add an iOS certificate
The iOS flow uses the same Console page, with a shorter set of fields:
- **Name**: a descriptive label, for example "Production iOS Certificate".
- **Platform**: `iOS`.
- **Certificate File**: your `.p12` file.
- **Certificate password**: the password you set when exporting the `.p12`.
- **Provisioning Profiles**: your `.mobileprovision` file. If your app ships extensions (a widget, a share extension), attach one profile per target, since each needs its own bundle ID and entitlements.

Uploading a .p12 certificate and provisioning profile
Via CLI:
```bash
npx @capawesome/cli apps:certificates:create \
--app-id \
--platform ios \
--name "Production iOS Certificate" \
--file ./distribution.p12 \
--password \
--provisioning-profile ./profile.mobileprovision
```
Once a certificate exists, `apps:certificates:list`, `apps:certificates:get`, `apps:certificates:update`, and `apps:certificates:delete` manage it from the same CLI without opening the Console again.
## Trigger a signed build
With a certificate uploaded, point a build at it by name. In the Console, the "Build from Git" dialog lets you pick a build type per platform (Android: `Debug`/`Release`; iOS: `Simulator`/`Development`/`Ad-Hoc`/`App Store`/`Enterprise`); choosing a signed type reveals a Signing certificate field where you select the certificate you uploaded:
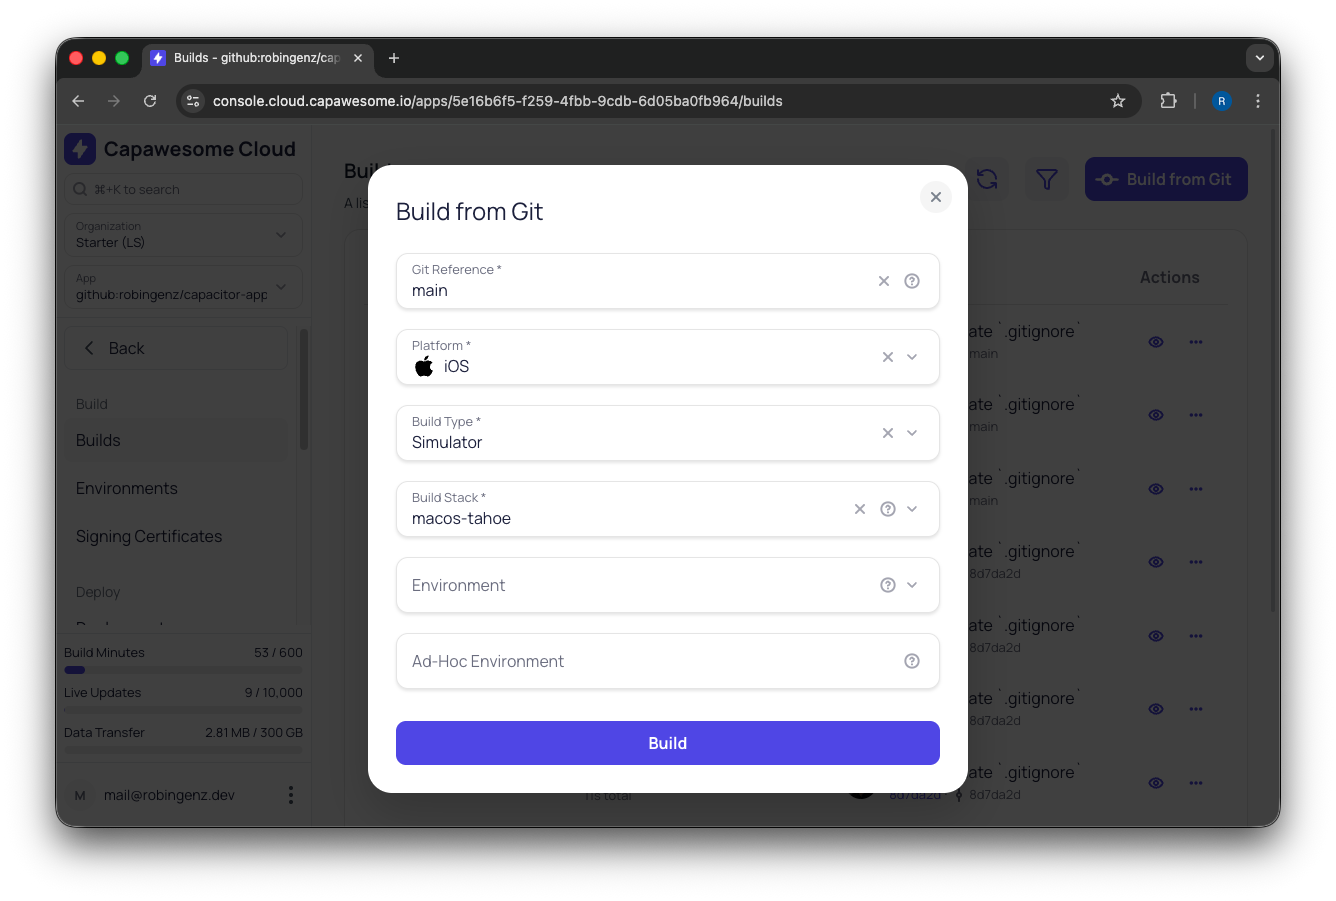
Triggering an iOS build from the Console — signed build types add a Signing certificate field
The CLI equivalent:
```bash
npx @capawesome/cli apps:builds:create \
--app-id \
--platform ios \
--certificate "Production iOS Certificate" \
--git-ref main \
--type app-store \
--ipa
```
`--certificate` takes the certificate's name, not its ID, so renaming a certificate later means updating any script that references the old name. Other flags worth knowing: `--configuration` and `--environment` select build-time settings and [secrets](./using-environment-variables-and-secrets-in-capawesome-cloud-builds.md), `--detached` returns immediately instead of waiting for the build to finish, and `--aab`, `--apk`, or `--ipa` download the resulting artifact straight to your machine. Add `--json` to any command when you're scripting around the output.
## Automate signed builds
A one-off signed build is enough for a release candidate. An [automation](../../cloud/automations/index.md) runs the same signed build every time you push to a branch or tag, with no manual trigger:
```bash
npx @capawesome/cli apps:automations:create \
--app-id \
--platform android \
--certificate "Production Android Key" \
--type release \
--trigger-type branch \
--trigger-pattern main
```
Certificates, environments, and store destinations are all referenced by name in automations, the same way they are in `apps:builds:create`. Adding a store destination turns the signed build into a submission; [Auto-Submit a Capacitor App to TestFlight and Google Play](./auto-submit-capacitor-app-to-testflight-and-google-play.md) continues from here with the destination setup for both stores. To change what an automation signs with later, `apps:automations:update` accepts the same `--certificate` flag, or an empty string to clear it. If a build fails to sign after you set this up, the most common causes are an expired certificate or a provisioning profile that no longer matches your app's bundle ID; the [CI/CD pitfalls guide](./ci-cd-for-capacitor-common-pitfalls.md) walks through diagnosing both.
## FAQ
### How do I generate an Android keystore?
Run `keytool -genkey -v -keystore my-release-key.jks -keyalg RSA -keysize 2048 -validity 10000 -alias my-key-alias` from a terminal with a JDK installed, or skip the command line with the [Android Keystore Generator](https://capawesome.io/tools/android-keystore-generator/){:target="_blank"}, which produces the same `.jks` file in your browser. Either way, keep the file and its passwords somewhere safe. You'll need the same keystore for every future release of that app; generating a new one later means Google Play sees it as a different app and existing users can't update.
### Do I need separate certificates for development and production?
Yes, for iOS: an Apple Development certificate and an Apple Distribution certificate are different credentials from Apple, and you'll typically upload both as separate certificates. For Android, most teams sign debug and release builds with different keystores too. Either way, you don't pick a "type" when uploading. Capawesome Cloud detects development versus production from the certificate itself. Name each certificate clearly (for example "Production iOS Certificate") so you reference the right one by name in each automation.
### Can I reuse the same certificate across multiple automations?
Yes, a single uploaded certificate can back as many builds and automations as you want. There's no per-build or per-automation limit tied to a certificate itself.
### What happens if my certificate expires?
Builds referencing it start failing at the signing step. Android keystores are typically valid for decades and rarely expire mid-project, but iOS distribution certificates expire yearly. Generate or renew the certificate, upload the new file as a new certificate, then switch each automation to it with `apps:automations:update --certificate ""`. Delete the old certificate once no build references it.
### Does Capawesome Cloud store my private signing key securely?
Yes. Your `.p12` certificates, provisioning profiles, and Android keystores are [encrypted at rest](https://capawesome.io/trust/){:target="_blank"}, and Capawesome Cloud is SOC 2 Type II compliant. If you'd rather not upload production keys to any third party, [choosing the right CI/CD approach](./choosing-the-right-ci-cd-approach-for-capacitor-apps.md) covers the trade-offs against managing signing yourself.
## Try Capawesome Cloud
[Try Capawesome Cloud Free](https://capawesome.io){ .md-button .md-button--primary }
## Conclusion
Upload each certificate once, name it after the build type it signs, and reference that name from an automation on your main branch. If you still need the signing material, the generators in [Prepare your files](#prepare-your-files) produce it free in the browser. For the broader question of whether a managed platform or a DIY pipeline fits your team, read [CI/CD for Capacitor Apps: Choosing the Right Approach](./choosing-the-right-ci-cd-approach-for-capacitor-apps.md). Bring your specific signing setup to the [Capawesome Discord server](https://discord.gg/VCXxSVjefW){:target="_blank"}, and subscribe to the [Capawesome newsletter](https://capawesome.io/newsletter/){:target="_blank"} for more guides like this one.
