---
description: Add push notifications to your Ionic Capacitor app on Android, iOS and web using the Firebase Cloud Messaging plugin. Step-by-step guide with FCM.
title: Capacitor Push Notifications: The Complete Guide - Capawesome
image: https://capawesome.io/docs/assets/images/social/blog/capacitor-push-notifications-guide.png
---
[Skip to content ](#capacitor-push-notifications-the-complete-guide)
[🖥️ Introducing the **Capacitor Electron Platform** — build desktop apps for macOS, Windows, and Linux. Free & open source. ](/blog/announcing-the-capacitor-electron-platform/)
* [ SDKs ](/docs/sdks/)
* [ Formbricks ](/docs/sdks/capacitor/formbricks/)
* [ Geocoder ](/docs/sdks/capacitor/geocoder/)
* [ Google Sign-In ](/docs/sdks/capacitor/google-sign-in/)
* [ Grafana Faro ](/docs/sdks/capacitor/grafana-faro/)
* [ Gyroscope ](/docs/sdks/capacitor/gyroscope/)
* [ Haptics ](/docs/sdks/capacitor/haptics/)
* [ Home Indicator ](/docs/sdks/capacitor/home-indicator/)
* [ In-App Browser ](/docs/sdks/capacitor/in-app-browser/)
* [ Install Referrer ](/docs/sdks/capacitor/install-referrer/)
* [ Intercom ](/docs/sdks/capacitor/intercom/)
* [ Intune ](/docs/sdks/capacitor/intune/)
* [ Keep Awake ](/docs/sdks/capacitor/keep-awake/)
* [ libSQL ](/docs/sdks/capacitor/libsql/)
* [ Light Sensor ](/docs/sdks/capacitor/light-sensor/)
* [ Live Update ](/docs/sdks/capacitor/live-update/)
* [ Localization ](/docs/sdks/capacitor/localization/)
* [ Mail Composer ](/docs/sdks/capacitor/mail-composer/)
* [ Managed Configurations ](/docs/sdks/capacitor/managed-configurations/)
* [ Maps Launcher ](/docs/sdks/capacitor/maps-launcher/)
* [ Media Session ](/docs/sdks/capacitor/media-session/)
* [ ML Kit ](/docs/sdks/capacitor/mlkit/)
* [ Navigation Bar ](/docs/sdks/capacitor/navigation-bar/)
* [ Network ](/docs/sdks/capacitor/network/)
* [ NFC ](/docs/sdks/capacitor/nfc/)
* [ Node.js ](/docs/sdks/capacitor/nodejs/)
* [ OAuth ](/docs/sdks/capacitor/oauth/)
* [ Passkeys ](/docs/sdks/capacitor/passkeys/)
* [ Password Autofill ](/docs/sdks/capacitor/password-autofill/)
* [ PDF Generator ](/docs/sdks/capacitor/pdf-generator/)
* [ PDF Viewer ](/docs/sdks/capacitor/pdf-viewer/)
* [ Pedometer ](/docs/sdks/capacitor/pedometer/)
* [ Permissions ](/docs/sdks/capacitor/permissions/)
* [ Phone Dialer ](/docs/sdks/capacitor/phone-dialer/)
* [ Photo Editor ](/docs/sdks/capacitor/photo-editor/)
* [ Photo Manipulator ](/docs/sdks/capacitor/photo-manipulator/)
* [ PixLive ](/docs/sdks/capacitor/pixlive/)
* [ PostHog ](/docs/sdks/capacitor/posthog/)
* [ Printer ](/docs/sdks/capacitor/printer/)
* [ Privacy Screen ](/docs/sdks/capacitor/privacy-screen/)
* [ Proximity Sensor ](/docs/sdks/capacitor/proximity-sensor/)
* [ Purchases ](/docs/sdks/capacitor/purchases/)
* [ RealtimeKit ](/docs/sdks/capacitor/realtimekit/)
* [ Root Detection ](/docs/sdks/capacitor/root-detection/)
* [ Screen Brightness ](/docs/sdks/capacitor/screen-brightness/)
* [ Screen Orientation ](/docs/sdks/capacitor/screen-orientation/)
* [ Screen Reader ](/docs/sdks/capacitor/screen-reader/)
* [ Screenshot ](/docs/sdks/capacitor/screenshot/)
* [ Secure Preferences ](/docs/sdks/capacitor/secure-preferences/)
* [ Settings Launcher ](/docs/sdks/capacitor/settings-launcher/)
* [ Shake ](/docs/sdks/capacitor/shake/)
* [ Silent Mode ](/docs/sdks/capacitor/silent-mode/)
* [ SIM ](/docs/sdks/capacitor/sim/)
* [ SMS Composer ](/docs/sdks/capacitor/sms-composer/)
* [ Speech Recognition ](/docs/sdks/capacitor/speech-recognition/)
* [ Speech Synthesis ](/docs/sdks/capacitor/speech-synthesis/)
* [ Share Target ](/docs/sdks/capacitor/share-target/)
* [ Square Mobile Payments ](/docs/sdks/capacitor/square-mobile-payments/)
* [ SQLite ](/docs/sdks/capacitor/sqlite/)
* [ Superwall ](/docs/sdks/capacitor/superwall/)
* [ System WebView ](/docs/sdks/capacitor/system-webview/)
* [ Tauri ](/docs/sdks/capacitor/tauri/)
* [ Text Interaction ](/docs/sdks/capacitor/text-interaction/)
* [ Text Zoom ](/docs/sdks/capacitor/text-zoom/)
* [ Thermal State ](/docs/sdks/capacitor/thermal-state/)
* [ Toast ](/docs/sdks/capacitor/toast/)
* [ Torch ](/docs/sdks/capacitor/torch/)
* [ Vault ](/docs/sdks/capacitor/vault/)
* [ Volume ](/docs/sdks/capacitor/volume/)
* [ Wallet ](/docs/sdks/capacitor/wallet/)
* [ Wifi ](/docs/sdks/capacitor/wifi/)
* [ YouTube Player ](/docs/sdks/capacitor/youtube-player/)
* [ Zip ](/docs/sdks/capacitor/zip/)
* [ Cordova ](/docs/sdks/cordova/)
* [ Cloud ](/docs/cloud/)
* [ Integrations ](/docs/cloud/live-updates/integrations/)
* Concepts
* Reference
* [ Troubleshooting ](/docs/cloud/live-updates/troubleshooting/)
* [ FAQ ](/docs/cloud/live-updates/faq/)
* [ Native Builds ](/docs/cloud/native-builds/)
* [ Set Up Environments ](/docs/cloud/native-builds/environments/)
* [ Overwrite Native Configurations ](/docs/cloud/native-builds/native-configurations/)
* [ Auto-Increment Build Numbers ](/docs/cloud/native-builds/auto-incrementing-build-numbers/)
* [ Configure the Web Build Script ](/docs/cloud/native-builds/web-build-script/)
* [ Build from a Monorepo ](/docs/cloud/native-builds/monorepo/)
* [ Use pnpm, Yarn, or bun ](/docs/cloud/native-builds/package-managers/)
* [ Install Private npm Packages ](/docs/cloud/native-builds/npm-private-registry/)
* [ Override the Java Version ](/docs/cloud/native-builds/override-java-version/)
* [ Custom iOS Provisioning Profiles ](/docs/cloud/native-builds/custom-ios-provisioning-profiles/)
* [ Build without Git ](/docs/cloud/native-builds/build-without-git/)
* [ Access Git Behind a Firewall ](/docs/cloud/native-builds/firewall-access/)
* [ Integrations ](/docs/cloud/native-builds/integrations/)
* Reference
* [ Troubleshooting ](/docs/cloud/native-builds/troubleshooting/)
* [ FAQ ](/docs/cloud/native-builds/faq/)
* [ App Store Publishing ](/docs/cloud/app-store-publishing/)
* [ Submit a Build ](/docs/cloud/app-store-publishing/submit-a-build/)
* [ Submit Automatically After a Build ](/docs/cloud/app-store-publishing/submit-automatically/)
* [ Troubleshooting ](/docs/cloud/app-store-publishing/troubleshooting/)
* [ FAQ ](/docs/cloud/app-store-publishing/faq/)
* [ Automations ](/docs/cloud/automations/)
* [ Reference ](/docs/cloud/automations/reference/)
* [ Troubleshooting ](/docs/cloud/automations/troubleshooting/)
* [ FAQ ](/docs/cloud/automations/faq/)
* [ Assist ](/docs/cloud/assist/)
* [ CLI ](/docs/cloud/cli/)
* APIs and SDKs
* [ Webhooks ](/docs/cloud/webhooks/)
* [ Integrations ](/docs/cloud/integrations/)
* Account
* [ Organization ](/docs/cloud/organizations/)
* [ Two-Factor Enforcement ](/docs/cloud/organizations/two-factor-authentication/)
* [ Audit Logs ](/docs/cloud/organizations/audit-logs/)
* [ Billing ](/docs/cloud/organizations/billing/)
* [ License Keys ](/docs/cloud/license-keys/)
* [ AI ](/docs/ai/)
* [ Insiders ](/docs/insiders/)
* [ Billing & Plans ](/docs/insiders/billing-and-plans/)
* [ FAQ ](/docs/insiders/faq/)
* [ License ](https://capawesome.io/legal/eula/)
* [ Support ](/docs/support/)
* [ Contributing ](/docs/contributing/)
* Contributing code
* [ Code of Conduct ](/docs/contributing/code-of-conduct/)
* [ Questions ](https://docs.github.com/en/discussions/collaborating-with-your-community-using-discussions/participating-in-a-discussion#creating-a-discussion)
* [ Blog ](/blog/)
* Categories
* [ Create a Firebase project ](#create-a-firebase-project)
* [ Install the Firebase Cloud Messaging Plugin ](#install-the-firebase-cloud-messaging-plugin)
* [ Android ](#android)
* [ iOS ](#ios)
* [ Web ](#web)
* [ Integrate Push Notifications ](#integrate-push-notifications)
* [ Run the app ](#run-the-app)
* [ Send Push Notifications with Firebase ](#send-push-notifications-with-firebase)
* [ FAQ ](#faq)
* [ Conclusion ](#conclusion)
* Related links
# Capacitor Push Notifications: The Complete Guide[¶](#capacitor-push-notifications-the-complete-guide "Permanent link")
Push notifications are one of the most commonly used features for mobile apps. This guide covers **Capacitor push notifications** on Android, iOS, and the web using the [Firebase Cloud Messaging](https://firebase.google.com/docs/cloud-messaging) SDK and the [Capacitor Firebase Cloud Messaging plugin](/docs/sdks/capacitor/firebase/cloud-messaging/)—whether you're building with Capacitor alone or also using **Ionic**.

Capacitor Push Notifications Demo
For this we will create a new Ionic Capacitor app. First we will set up our Firebase project and configure the Capacitor App. Then we will add the Firebase Cloud Messaging SDK. Last but not least, we will test the implementation using the Firebase Console and the Firebase Admin SDK. This guide covers everything that is needed. If you have already done certain steps such as creating a Firebase project, just skip those steps. Let's get started!
AI-Assisted Setup
For a more guided experience, add the [Capawesome skills](https://github.com/capawesome-team/skills) to your project with `npx skills add capawesome-team/skills --skill capacitor-push-notifications` and use the following prompt with your preferred AI coding assistant:
`` [](#%5F%5Fcodelineno-0-1)Use the `capacitor-push-notifications` skill from `capawesome-team/skills` to help me set up push notifications in my Capacitor app.
``
[  ](/)
## Why Firebase?[¶](#why-firebase "Permanent link")
With [Firebase](https://firebase.google.com/), Google offers a great mobile platform that lets you build high-quality apps very quickly and efficiently. Firebase Cloud Messaging is the cross-platform messaging solution that lets you reliably send messages at no cost. Firebase has a large community and SDKs that work well in Capacitor; we also offer a [Cloud Firestore](/docs/sdks/capacitor/firebase/cloud-firestore/) plugin for native database access alongside Cloud Messaging.
## Preparation[¶](#preparation "Permanent link")
First, we will create a new app, which we will then configure step-by-step.
### Create a new App[¶](#create-a-new-app "Permanent link")
To create a new project, we simply use the [Ionic CLI](https://ionicframework.com/docs/cli). For this, first install the CLI globally:
`[](#%5F%5Fcodelineno-1-1)npm i -g @ionic/cli
`
After that, create a new project with the `ionic start` command:
`[](#%5F%5Fcodelineno-2-1)npx ionic start capacitor-firebase-messaging-demo blank --type=angular --capacitor --package-id=YOUR_PACKAGE_ID
`
Warning
Be sure to specify a unique identifier for the `package-id`. It must be in reverse domain name notation, generally representing a domain name that you or your company owns. In this example, `dev.robingenz.capacitorjs.demo.firebasemessaging` will be used as `package-id`. Choose a different identifier for your app.
In this case, the app is called `capacitor-firebase-messaging-demo`, the starter template is `blank` and the project type for the purposes of this guide is Angular. You can also choose Vue or React, for example. Additionally, we enable the Capacitor integration with `--capacitor` and set a custom package identifier.
Once everything is ready, you should see this output:
`[](#%5F%5Fcodelineno-3-1)Your Ionic app is ready! Follow these next steps:
[](#%5F%5Fcodelineno-3-2)
[](#%5F%5Fcodelineno-3-3)- Go to your new project: cd ./capacitor-firebase-messaging-demo
[](#%5F%5Fcodelineno-3-4)- Run ionic serve within the app directory to see your app in the browser
[](#%5F%5Fcodelineno-3-5)- Run ionic capacitor add to add a native iOS or Android project using Capacitor
[](#%5F%5Fcodelineno-3-6)- Generate your app icon and splash screens using cordova-res --skip-config --copy
[](#%5F%5Fcodelineno-3-7)- Explore the Ionic docs for components, tutorials, and more: https://ion.link/docs
[](#%5F%5Fcodelineno-3-8)- Building an enterprise app? Ionic has Enterprise Support and Features: https://ion.link/enterprise-edition
`
#### Add the Android platform[¶](#add-the-android-platform "Permanent link")
Install the `@capacitor/android` package and add the Android platform:
`[](#%5F%5Fcodelineno-4-1)npm install @capacitor/android
[](#%5F%5Fcodelineno-4-2)npx cap add android
`
#### Add the iOS platform[¶](#add-the-ios-platform "Permanent link")
Install the `@capacitor/ios` package and add the iOS platform:
`[](#%5F%5Fcodelineno-5-1)npm install @capacitor/ios
[](#%5F%5Fcodelineno-5-2)npx cap add ios
`
### Create a Firebase project[¶](#create-a-firebase-project "Permanent link")
Before we can set up Firebase Cloud Messaging we need to create a Firebase project. If you already have a project, you can skip this step.
Go to the [Firebase console](https://console.firebase.google.com/) and click the **Add project** button. Enter a project name and create the project.
### Install the Firebase Cloud Messaging Plugin[¶](#install-the-firebase-cloud-messaging-plugin "Permanent link")
We will use the [Capacitor Firebase Cloud Messaging plugin](/docs/sdks/capacitor/firebase/cloud-messaging/) to integrate the Firebase Cloud Messaging SDK into the app. Install the npm package and then synchronize the Capacitor project:
`[](#%5F%5Fcodelineno-6-1)npm install @capacitor-firebase/messaging firebase
[](#%5F%5Fcodelineno-6-2)npx ionic cap sync
`
Now let's get started with the configuration of the different platforms.
## Android[¶](#android "Permanent link")
We will start with Android, as this is the easiest. We will go through all the steps in detail. Just skip the steps you have already done if you are applying the guide to an existing project.
### Add Firebase to your Android App[¶](#add-firebase-to-your-android-app "Permanent link")
Navigate to the Firebase project you just created. In the center of the [Project overview](https://console.firebase.google.com/project/%5F/overview) page, click the Android icon to launch the setup workflow. If you've already added an app to your Firebase project, click `Add app` to display the platform options.

Enter your Android package name and your app nickname. Click on `Register App`.

Now click on `Download google-services.json` and download the `google-services.json` file. Then click twice on `Next` and on `Continue to console`. Move the downloaded file to the `/android/app/` directory of your project.
### Configure the Push Notification Icon[¶](#configure-the-push-notification-icon "Permanent link")
If no icon is specified, Android uses the application icon, but the push icon should be white pixels on a transparent background. Since the application icon does not usually look like this, it shows a white square or circle. Therefore, it is recommended to provide a separate icon for push notifications.
To do this, add the following line to the `android/app/src/main/AndroidManifest.xml` file **in** the `application` tag:
android/app/src/main/AndroidManifest.xml
`[](#%5F%5Fcodelineno-7-1)
`
After that you have to add the appropriate icons to the `android/app/src/main/res/mipmap-*` folders. The icon files should have the name as configured in the `AndroidManifest.xml` file. In this example they are called `notification_icon.png`.
Tip
You can create Android Notification Icons using the [Android Asset Studio](https://romannurik.github.io/AndroidAssetStudio/icons-notification.html) for example.
`[](#%5F%5Fcodelineno-8-1)
`
## iOS[¶](#ios "Permanent link")
Adding push notifications to iOS is unfortunately much more complicated. You also need a paid [Apple Developer account](https://developer.apple.com/).
### Add Firebase to your iOS App[¶](#add-firebase-to-your-ios-app "Permanent link")
Navigate back to the [Firebase project](https://console.firebase.google.com/project/%5F/overview) you just created. In the center of the project overview page, click the iOS icon to launch the setup workflow. If you've already added an app to your Firebase project, click `Add app` to display the platform options.

Enter your Apple bundle ID and your app nickname. Click on `Register App`.

Now click on the button `Download GoogleService-Info.plist` and download the `GoogleService-Info.plist` file. After that click three times on `Next` and then on `Continue to console`. Move the downloaded file to the `/ios/App/App/` directory of your project.
Now open Xcode by running `npx cap open ios` in your project. Register the file in your Xcode project by dragging it from `/ios/App/App/GoogleService-Info.plist` into the Xcode file explorer into the folder `/App/App`. If prompted, select to add the config file to all targets.

Now it should look like this:

### Register the App ID[¶](#register-the-app-id "Permanent link")
If you have not yet registered your App Identifier with Apple, log in to your [App Store Developer Account](https://developer.apple.com/account/){:target="_blank"} and navigate to [Identifiers](https://developer.apple.com/account/resources/identifiers/list). Add a new App Identifier and make sure that you select the \_Push Notifications_ capability.

Enter the `appId` from the `capacitor.config.ts` as bundle ID. Click on `Continue` and then on `Register`. Your App Identifier is now registered with Apple.
### Create an APNs certificate or key[¶](#create-an-apns-certificate-or-key "Permanent link")
Next, navigate to the [Keys](https://developer.apple.com/account/resources/authkeys/list) page and click the to add a new key.

Enter a name and enable Apple Push Notifications service (APNs). Click on `Continue` and then on `Register`. Next, download your key and write down the key ID. Usually the Key ID is also included in the filename of the downloaded key.
After download, you need to upload the key in the [Messaging Tab](https://console.firebase.google.com/project/%5F/settings/cloudmessaging/) of the Firebase Console. Click the `Upload` button, select your key, enter your Key ID and your Team ID and upload the key to Firebase.

You can find the Team ID in your [Membership details](https://developer.apple.com/account#membership-details).
### Add initialization code[¶](#add-initialization-code "Permanent link")
Add the following to your app's `AppDelegate.swift`:
| ios/App/App/AppDelegate.swift | |
| --------------------------------------------------------------------------------------------------------------------------------------------------------------------------------------------------------------------------------------------------------------------------------------------------------------------- | ----------------------------------------------------------------------------------------------------------------------------------------------------------------------------------------------------------------------------------------------------------------------------------------------------------------------------------------------------------------------------------------------------------------------------------------------------------------------------------------------------------------------------------------------------------------------------------------------------------------------------------------------------------------------------------------------------------------------------------------------------------------------------------------------------------------------- |
| [ 1](#%5F%5Fcodelineno-9-1) [ 2](#%5F%5Fcodelineno-9-2) [ 3](#%5F%5Fcodelineno-9-3) [ 4](#%5F%5Fcodelineno-9-4) [ 5](#%5F%5Fcodelineno-9-5) [ 6](#%5F%5Fcodelineno-9-6) [ 7](#%5F%5Fcodelineno-9-7) [ 8](#%5F%5Fcodelineno-9-8) [ 9](#%5F%5Fcodelineno-9-9) [10](#%5F%5Fcodelineno-9-10) [11](#%5F%5Fcodelineno-9-11) | func application(\_ application: UIApplication, didRegisterForRemoteNotificationsWithDeviceToken deviceToken: Data) { NotificationCenter.default.post(name: .capacitorDidRegisterForRemoteNotifications, object: deviceToken) } func application(\_ application: UIApplication, didFailToRegisterForRemoteNotificationsWithError error: Error) { NotificationCenter.default.post(name: .capacitorDidFailToRegisterForRemoteNotifications, object: error) } func application(\_ application: UIApplication, didReceiveRemoteNotification userInfo: \[AnyHashable : Any\], fetchCompletionHandler completionHandler: @escaping (UIBackgroundFetchResult) \-> Void) { NotificationCenter.default.post(name: Notification.Name.init("didReceiveRemoteNotification"), object: completionHandler, userInfo: userInfo) } |
This makes sure that the plugin is notified about new Apple Push Notification service (APNs) device tokens and incoming push notifications.
### Enable Push Notification capabilities[¶](#enable-push-notification-capabilities "Permanent link")
Last but not least you have to enable the `Push Notifications` and `Background Modes` capabilities in your Xcode project. To do this, open the project using the [Capacitor CLI](https://capacitorjs.com/docs/cli):
`[](#%5F%5Fcodelineno-10-1)npx cap open ios
`
Select the project `App` in the File Explorer, click on the corresponding target, switch to the tab `Signing & Capabilities` and now click on `+ Capabilities`.

Search for `Push Notifications` and add the capability by double clicking on it. Also add the `Background Modes` capability and select the `Remote notifications` checkbox.

Yay, you've done it. The iOS configuration is now ready.
## Web[¶](#web "Permanent link")
Now we add push notifications to the web platform.
### Add Firebase to your Web App[¶](#add-firebase-to-your-web-app "Permanent link")
In the center of the project overview page, click the _Web+_ icon to launch the setup workflow. If you've already added an app to your Firebase project, click `Add app` to display the platform options.

Enter your app nickname and then click the `Register App` button.

You now need to add the Firebase configuration to your app. In our Angular app we add the Firebase configuration to the `src/environments/environment.ts` and `src/environments/environment.prod.ts` files:
| src/environments/environment.ts | |
| -------------------------------------------------------------------------------------------------------------------------------------------------------------------------------------------------------------------------------------------------------------------------------------------------------------------------------- | ----------------------------------------------------------------------------------------------------------------------------------------------------------------------------------------------------------------------------------------------------------------------------------------------- |
| [ 1](#%5F%5Fcodelineno-11-1) [ 2](#%5F%5Fcodelineno-11-2) [ 3](#%5F%5Fcodelineno-11-3) [ 4](#%5F%5Fcodelineno-11-4) [ 5](#%5F%5Fcodelineno-11-5) [ 6](#%5F%5Fcodelineno-11-6) [ 7](#%5F%5Fcodelineno-11-7) [ 8](#%5F%5Fcodelineno-11-8) [ 9](#%5F%5Fcodelineno-11-9) [10](#%5F%5Fcodelineno-11-10) [11](#%5F%5Fcodelineno-11-11) | export const environment \= { ..., firebase: { apiKey: "YOUR\_API\_KEY", authDomain: "YOUR\_AUTH\_DOMAIN", projectId: "YOUR\_PROJECT\_ID", storageBucket: "YOUR\_STORAGE\_BUCKET", messagingSenderId: "YOUR\_MESSAGING\_SENDER\_ID", appId: "YOUR\_APP\_ID" }, }; |
Replace the placeholders with your configuration values. If you use VueJS or React, you have to store the Firebase configuration in a different place.
Next, you need to modify the `src/app/app.component.ts` as follows:
| src/app/app.component.ts | |
| -------------------------------------------------------------------------------------------------------------------------------------------------------------------------------------------------------------------------------------------------------------------------------------------------------------------------------------------------------------------------------------------------------------------------------------------------------------------------------------------------------------------------------------------------------------------------------------------------------------------------------------------------------------------------------------------------------------------------------------------------------------------- | --------------------------------------------------------------------------------------------------------------------------------------------------------------------------------------------------------------------------------------------------------------------------------------------------------------------------------------------------------------------------------------------------------------------------------------------------------------------------------------------------------------------------------------------------------------------------------------------------------------------------------------------------------------------- |
| [ 1](#%5F%5Fcodelineno-12-1) [ 2](#%5F%5Fcodelineno-12-2) [ 3](#%5F%5Fcodelineno-12-3) [ 4](#%5F%5Fcodelineno-12-4) [ 5](#%5F%5Fcodelineno-12-5) [ 6](#%5F%5Fcodelineno-12-6) [ 7](#%5F%5Fcodelineno-12-7) [ 8](#%5F%5Fcodelineno-12-8) [ 9](#%5F%5Fcodelineno-12-9) [10](#%5F%5Fcodelineno-12-10) [11](#%5F%5Fcodelineno-12-11) [12](#%5F%5Fcodelineno-12-12) [13](#%5F%5Fcodelineno-12-13) [14](#%5F%5Fcodelineno-12-14) [15](#%5F%5Fcodelineno-12-15) [16](#%5F%5Fcodelineno-12-16) [17](#%5F%5Fcodelineno-12-17) [18](#%5F%5Fcodelineno-12-18) [19](#%5F%5Fcodelineno-12-19) [20](#%5F%5Fcodelineno-12-20) [21](#%5F%5Fcodelineno-12-21) [22](#%5F%5Fcodelineno-12-22) [23](#%5F%5Fcodelineno-12-23) [24](#%5F%5Fcodelineno-12-24) [25](#%5F%5Fcodelineno-12-25) | import { Component } from "@angular/core"; import { Capacitor } from "@capacitor/core"; import { IonicModule } from "@ionic/angular"; import { environment } from "src/environments/environment"; import { initializeApp } from "firebase/app"; @Component({ selector: "app-root", templateUrl: "app.component.html", styleUrls: \["app.component.scss"\], standalone: true, imports: \[IonicModule\], }) export class AppComponent { constructor() { this.initializeFirebase(); } public async initializeFirebase(): Promise { if (Capacitor.isNativePlatform()) { return; } initializeApp(environment.firebase); } } |
This makes sure that the Firebase JS SDK is only initialized on the web and not on the native platforms, since on Android and iOS we do not use the Firebase JS SDK but the Firebase Android SDK and the Firebase iOS SDK. These are already initialized using our downloaded configuration files.
Click on `Continue to console`.
### Configure Web Credentials with FCM[¶](#configure-web-credentials-with-fcm "Permanent link")
FCM Web uses so-called VAPID keys to authorize send requests to supported web push services. You can either generate a new key pair or import an existing pair. We will generate a new key pair in this example. For information on how to import an existing key pair, see [Import an existing key pair](https://firebase.google.com/docs/cloud-messaging/js/client#import%5Fan%5Fexisting%5Fkey%5Fpair).
Open the [Cloud Messaging Tab](https://console.firebase.google.com/project/%5F/settings/cloudmessaging/) in your Firebase project, scroll to the `Web configuration` section and click `Generate key pair`.

Copy the generated key into the files `src/environments/environment.ts` and `src/environments/environment.prod.ts`. They now look like this (with placeholder):
| src/environments/environment.ts | |
| -------------------------------------------------------------------------------------------------------------------------------------------------------------------------------------------------------------------------------------------------------------------------------------------------------------------------------------------------------------- | --------------------------------------------------------------------------------------------------------------------------------------------------------------------------------------------------------------------------------------------------------------------------------------------------------------------------------- |
| [ 1](#%5F%5Fcodelineno-13-1) [ 2](#%5F%5Fcodelineno-13-2) [ 3](#%5F%5Fcodelineno-13-3) [ 4](#%5F%5Fcodelineno-13-4) [ 5](#%5F%5Fcodelineno-13-5) [ 6](#%5F%5Fcodelineno-13-6) [ 7](#%5F%5Fcodelineno-13-7) [ 8](#%5F%5Fcodelineno-13-8) [ 9](#%5F%5Fcodelineno-13-9) [10](#%5F%5Fcodelineno-13-10) [11](#%5F%5Fcodelineno-13-11) [12](#%5F%5Fcodelineno-13-12) | export const environment \= { ..., firebase: { apiKey: "YOUR\_API\_KEY", authDomain: "YOUR\_AUTH\_DOMAIN", projectId: "YOUR\_PROJECT\_ID", storageBucket: "YOUR\_STORAGE\_BUCKET", messagingSenderId: "YOUR\_MESSAGING\_SENDER\_ID", appId: "YOUR\_APP\_ID", vapidKey: "YOUR\_VAPID\_KEY" }, }; |
### Add the Service Worker[¶](#add-the-service-worker "Permanent link")
Next, add a service worker to your project by creating an empty file named `firebase-messaging-sw.js` in the `src/` folder.
Add this file to your [Assets configuration](https://angular.io/guide/workspace-config#asset-config):
angular.json
`[](#%5F%5Fcodelineno-14-1)"assets": [
[](#%5F%5Fcodelineno-14-2) "src/firebase-messaging-sw.js"
[](#%5F%5Fcodelineno-14-3)]
`
If you don't want to receive push notifications on the web while your application is in the background, you are now done.
If you want to receive push notifications in the background, add the following content to the `firebase-messaging-sw.js` file and replace the placeholders with your Firebase configuration:
| firebase-messaging-sw.js | |
| -------------------------------------------------------------------------------------------------------------------------------------------------------------------------------------------------------------------------------------------------------------------------------------------------------------------------------------------------------------------------------------------------------------------------------------------------------------------------------------- | ----------------------------------------------------------------------------------------------------------------------------------------------------------------------------------------------------------------------------------------------------------------------------------------------------------------------------------------------------------------------------------------------------------------------------------------------------------------------------------- |
| [ 1](#%5F%5Fcodelineno-15-1) [ 2](#%5F%5Fcodelineno-15-2) [ 3](#%5F%5Fcodelineno-15-3) [ 4](#%5F%5Fcodelineno-15-4) [ 5](#%5F%5Fcodelineno-15-5) [ 6](#%5F%5Fcodelineno-15-6) [ 7](#%5F%5Fcodelineno-15-7) [ 8](#%5F%5Fcodelineno-15-8) [ 9](#%5F%5Fcodelineno-15-9) [10](#%5F%5Fcodelineno-15-10) [11](#%5F%5Fcodelineno-15-11) [12](#%5F%5Fcodelineno-15-12) [13](#%5F%5Fcodelineno-15-13) [14](#%5F%5Fcodelineno-15-14) [15](#%5F%5Fcodelineno-15-15) [16](#%5F%5Fcodelineno-15-16) | importScripts( "https://www.gstatic.com/firebasejs/9.7.0/firebase-app-compat.js", ); importScripts( "https://www.gstatic.com/firebasejs/9.7.0/firebase-messaging-compat.js", ); firebase.initializeApp({ apiKey: "YOUR\_API\_KEY", authDomain: "YOUR\_AUTH\_DOMAIN", projectId: "YOUR\_PROJECT\_ID", storageBucket: "YOUR\_STORAGE\_BUCKET", messagingSenderId: "YOUR\_MESSAGING\_SENDER\_ID", appId: "YOUR\_APP\_ID", }); const messaging \= firebase.messaging(); |
More information about receiving push messages on the web can be found at [Receive messages in a JavaScript client](https://firebase.google.com/docs/cloud-messaging/js/receive).
## Integrate Push Notifications[¶](#integrate-push-notifications "Permanent link")
Now let's see the Firebase messaging plugin in action. For this, let's first take a look at the following APIs of the plugin:
* [requestPermissions()](/docs/sdks/capacitor/firebase/cloud-messaging/#requestpermissions): Use this method to request permissions to allow push notifications to be displayed.
* [getToken()](/docs/sdks/capacitor/firebase/cloud-messaging/#gettoken): This method is needed to request an FCM token. An FCM token is unique and always associated with a specific app installation. Using this token you are able to send push notifications to a specific device. It is common to request the token at app start and send it to the app server. There, the token can be assigned to a user so that individual users can be notified via push notifications using their FCM token. Note that the FCM token can change over time.
* [addListener('notificationReceived', ...)](/docs/sdks/capacitor/firebase/cloud-messaging/#addlistenernotificationreceived): This listener notifies you about incoming push notifications.
* [addListener('notificationActionPerformed', ...)](/docs/sdks/capacitor/firebase/cloud-messaging/#addlistenernotificationactionperformed): This listener is called when a push notification action is performed. This is the case, for example, when the user opens the notification.
We now use these methods in the `HomePage` component. Therefore copy the following code into your `src/app/home.page.ts` file:
| src/app/home.page.ts | |
| -------------------------------------------------------------------------------------------------------------------------------------------------------------------------------------------------------------------------------------------------------------------------------------------------------------------------------------------------------------------------------------------------------------------------------------------------------------------------------------------------------------------------------------------------------------------------------------------------------------------------------------------------------------------------------------------------------------------------------------------------------------------------------------------------------------------------------------------------------------------------------------------------------------------------------------------------------------------------------------------------------------------------------------------------------------------------------------------------------------------------------------------------------------------------------------------------------------------------------------------------------------------------------------------------------------------------------------------------------------------------------------------------------------------------------------------------------------------------------------------------------------------------------------------------------------------------------------------------------------------------------------------------------------------------------------------------------- | ------------------------------------------------------------------------------------------------------------------------------------------------------------------------------------------------------------------------------------------------------------------------------------------------------------------------------------------------------------------------------------------------------------------------------------------------------------------------------------------------------------------------------------------------------------------------------------------------------------------------------------------------------------------------------------------------------------------------------------------------------------------------------------------------------------------------------------------------------------------------------------------------------------------------------------------------------------------------------------------------------------------------------------------------------------------------------------------------------------------------------------------------------------------------------------------------------------------------------------------------------------------------------------------------------------------------------------------------------------------------------------------------------------------------------------------------------------------------------------------------------------------------------------------------------------------------------------------------------------------------------------------------------------------------------------------------------------------------------------------------------------------------------------------------------------------------------- |
| [ 1](#%5F%5Fcodelineno-16-1) [ 2](#%5F%5Fcodelineno-16-2) [ 3](#%5F%5Fcodelineno-16-3) [ 4](#%5F%5Fcodelineno-16-4) [ 5](#%5F%5Fcodelineno-16-5) [ 6](#%5F%5Fcodelineno-16-6) [ 7](#%5F%5Fcodelineno-16-7) [ 8](#%5F%5Fcodelineno-16-8) [ 9](#%5F%5Fcodelineno-16-9) [10](#%5F%5Fcodelineno-16-10) [11](#%5F%5Fcodelineno-16-11) [12](#%5F%5Fcodelineno-16-12) [13](#%5F%5Fcodelineno-16-13) [14](#%5F%5Fcodelineno-16-14) [15](#%5F%5Fcodelineno-16-15) [16](#%5F%5Fcodelineno-16-16) [17](#%5F%5Fcodelineno-16-17) [18](#%5F%5Fcodelineno-16-18) [19](#%5F%5Fcodelineno-16-19) [20](#%5F%5Fcodelineno-16-20) [21](#%5F%5Fcodelineno-16-21) [22](#%5F%5Fcodelineno-16-22) [23](#%5F%5Fcodelineno-16-23) [24](#%5F%5Fcodelineno-16-24) [25](#%5F%5Fcodelineno-16-25) [26](#%5F%5Fcodelineno-16-26) [27](#%5F%5Fcodelineno-16-27) [28](#%5F%5Fcodelineno-16-28) [29](#%5F%5Fcodelineno-16-29) [30](#%5F%5Fcodelineno-16-30) [31](#%5F%5Fcodelineno-16-31) [32](#%5F%5Fcodelineno-16-32) [33](#%5F%5Fcodelineno-16-33) [34](#%5F%5Fcodelineno-16-34) [35](#%5F%5Fcodelineno-16-35) [36](#%5F%5Fcodelineno-16-36) [37](#%5F%5Fcodelineno-16-37) [38](#%5F%5Fcodelineno-16-38) [39](#%5F%5Fcodelineno-16-39) [40](#%5F%5Fcodelineno-16-40) [41](#%5F%5Fcodelineno-16-41) [42](#%5F%5Fcodelineno-16-42) [43](#%5F%5Fcodelineno-16-43) [44](#%5F%5Fcodelineno-16-44) [45](#%5F%5Fcodelineno-16-45) [46](#%5F%5Fcodelineno-16-46) [47](#%5F%5Fcodelineno-16-47) [48](#%5F%5Fcodelineno-16-48) [49](#%5F%5Fcodelineno-16-49) [50](#%5F%5Fcodelineno-16-50) [51](#%5F%5Fcodelineno-16-51) [52](#%5F%5Fcodelineno-16-52) [53](#%5F%5Fcodelineno-16-53) [54](#%5F%5Fcodelineno-16-54) [55](#%5F%5Fcodelineno-16-55) | import { Component } from "@angular/core"; import { FirebaseMessaging, GetTokenOptions, } from "@capacitor-firebase/messaging"; import { Capacitor } from "@capacitor/core"; import { IonicModule } from "@ionic/angular"; import { environment } from "src/environments/environment"; @Component({ selector: "app-home", templateUrl: "home.page.html", styleUrls: \["home.page.scss"\], standalone: true, imports: \[IonicModule\], }) export class HomePage { public token \= ""; constructor() { FirebaseMessaging.addListener("notificationReceived", (event) \=> { console.log("notificationReceived: ", { event }); }); FirebaseMessaging.addListener("notificationActionPerformed", (event) \=> { console.log("notificationActionPerformed: ", { event }); }); if (Capacitor.getPlatform() \=== "web") { navigator.serviceWorker.addEventListener("message", (event: any) \=> { console.log("serviceWorker message: ", { event }); const notification \= new Notification(event.data.notification.title, { body: event.data.notification.body, }); notification.onclick \= (event) \=> { console.log("notification clicked: ", { event }); }; }); } } public async requestPermissions(): Promise { await FirebaseMessaging.requestPermissions(); } public async getToken(): Promise { const options: GetTokenOptions \= { vapidKey: environment.firebase.vapidKey, }; if (Capacitor.getPlatform() \=== "web") { options.serviceWorkerRegistration \= await navigator.serviceWorker.register("firebase-messaging-sw.js"); } const { token } \= await FirebaseMessaging.getToken(options); this.token \= token; } } |
Lines 27 to 37 contain additional customizations for the web platform. The listener `navigator.serviceWorker.addEventListener("message", ...)` is called when the browser tab of the application is not focused. Using the [Notification Web API](https://developer.mozilla.org/en-US/docs/Web/API/notification), you can show a notification.
Next, we will add the related template. To keep the example as simple as possible, we just create two buttons to manually call the `requestPermissions()` and `getToken()` methods. Copy the following code into your `src/app/home.page.html` file:
| src/app/home.page.html | |
| -------------------------------------------------------------------------------------------------------------------------------------------------------------------------------------------------------------------------------------------------------------------------------------------------------------------------------------------------------------------------------------------------------------------------------------------------------------------------------------------------------------------------------------------------------------------------------------------------------------------------------------------------------------------------------------------------------------------------------------------------------------------------------------------------------------------------------------------------------------------------------------------------------------------------------------------------------- | --------------------------------------------------------------------------------------------------------------------------------------------------------------------------------------------------------------------------------------------------------------------------------------------------------------------------------------------------------------------------------------------------------------------------------------------------------------------------------------------------------------------------------------------------------------------------------------------------------------------------------------------------------------------------------------------------------------------------------------------------------------------------------------------------------------------------------------------------------------------------------------------------------------------- |
| [ 1](#%5F%5Fcodelineno-17-1) [ 2](#%5F%5Fcodelineno-17-2) [ 3](#%5F%5Fcodelineno-17-3) [ 4](#%5F%5Fcodelineno-17-4) [ 5](#%5F%5Fcodelineno-17-5) [ 6](#%5F%5Fcodelineno-17-6) [ 7](#%5F%5Fcodelineno-17-7) [ 8](#%5F%5Fcodelineno-17-8) [ 9](#%5F%5Fcodelineno-17-9) [10](#%5F%5Fcodelineno-17-10) [11](#%5F%5Fcodelineno-17-11) [12](#%5F%5Fcodelineno-17-12) [13](#%5F%5Fcodelineno-17-13) [14](#%5F%5Fcodelineno-17-14) [15](#%5F%5Fcodelineno-17-15) [16](#%5F%5Fcodelineno-17-16) [17](#%5F%5Fcodelineno-17-17) [18](#%5F%5Fcodelineno-17-18) [19](#%5F%5Fcodelineno-17-19) [20](#%5F%5Fcodelineno-17-20) [21](#%5F%5Fcodelineno-17-21) [22](#%5F%5Fcodelineno-17-22) [23](#%5F%5Fcodelineno-17-23) [24](#%5F%5Fcodelineno-17-24) [25](#%5F%5Fcodelineno-17-25) [26](#%5F%5Fcodelineno-17-26) [27](#%5F%5Fcodelineno-17-27) [28](#%5F%5Fcodelineno-17-28) [29](#%5F%5Fcodelineno-17-29) [30](#%5F%5Fcodelineno-17-30) [31](#%5F%5Fcodelineno-17-31) | Firebase Cloud Messaging About ⚡️ Capacitor plugin for Firebase Cloud Messaging (FCM). Demo Token Request Permissions Get Token |
## Run the app[¶](#run-the-app "Permanent link")
Now you can launch your app for the first time:
`[](#%5F%5Fcodelineno-18-1)# Run the web platform
[](#%5F%5Fcodelineno-18-2)npx ionic serve
[](#%5F%5Fcodelineno-18-3)
[](#%5F%5Fcodelineno-18-4)# Run the Android platform
[](#%5F%5Fcodelineno-18-5)npx ionic cap run android
[](#%5F%5Fcodelineno-18-6)
[](#%5F%5Fcodelineno-18-7)# Run the iOS platform
[](#%5F%5Fcodelineno-18-8)npx ionic cap run ios
`
Make sure that the first thing you do is to request the permission using the `Request Permissions` button.

Request Permissions
Next, request the FCM token and copy the FCM token to your clipboard so that you can next send a push notification to this device via the Firebase Console.
## Send Push Notifications with Firebase[¶](#send-push-notifications-with-firebase "Permanent link")
There are several ways to send push notifications with Firebase. You can use the [Firebase Console](https://console.firebase.google.com/) as well as the REST API. Firebase also offers the [Firebase Admin SDK](https://firebase.google.com/docs/admin/setup) for different environments.
### Firebase Console[¶](#firebase-console "Permanent link")
The Firebase Console is the easiest way to test your implementation. For this, navigate to the [Messaging](https://console.firebase.google.com/project/%5F/messaging/) page in your Firebase project. If you are visiting the messaging page for the first time, you will see a welcome screen. In this case, click on `Create your first campaign`, then select `Firebase Notification messages` and click `Create`.

From here you can directly configure your Push Notification. Enter a notification title and a notification body and click on `Send text message`.

Paste the FCM token from your clipboard into the input field `Add an FCM registration token`. Click on the on the right side to confirm the input. After that click on `Test` and the notification will be sent.
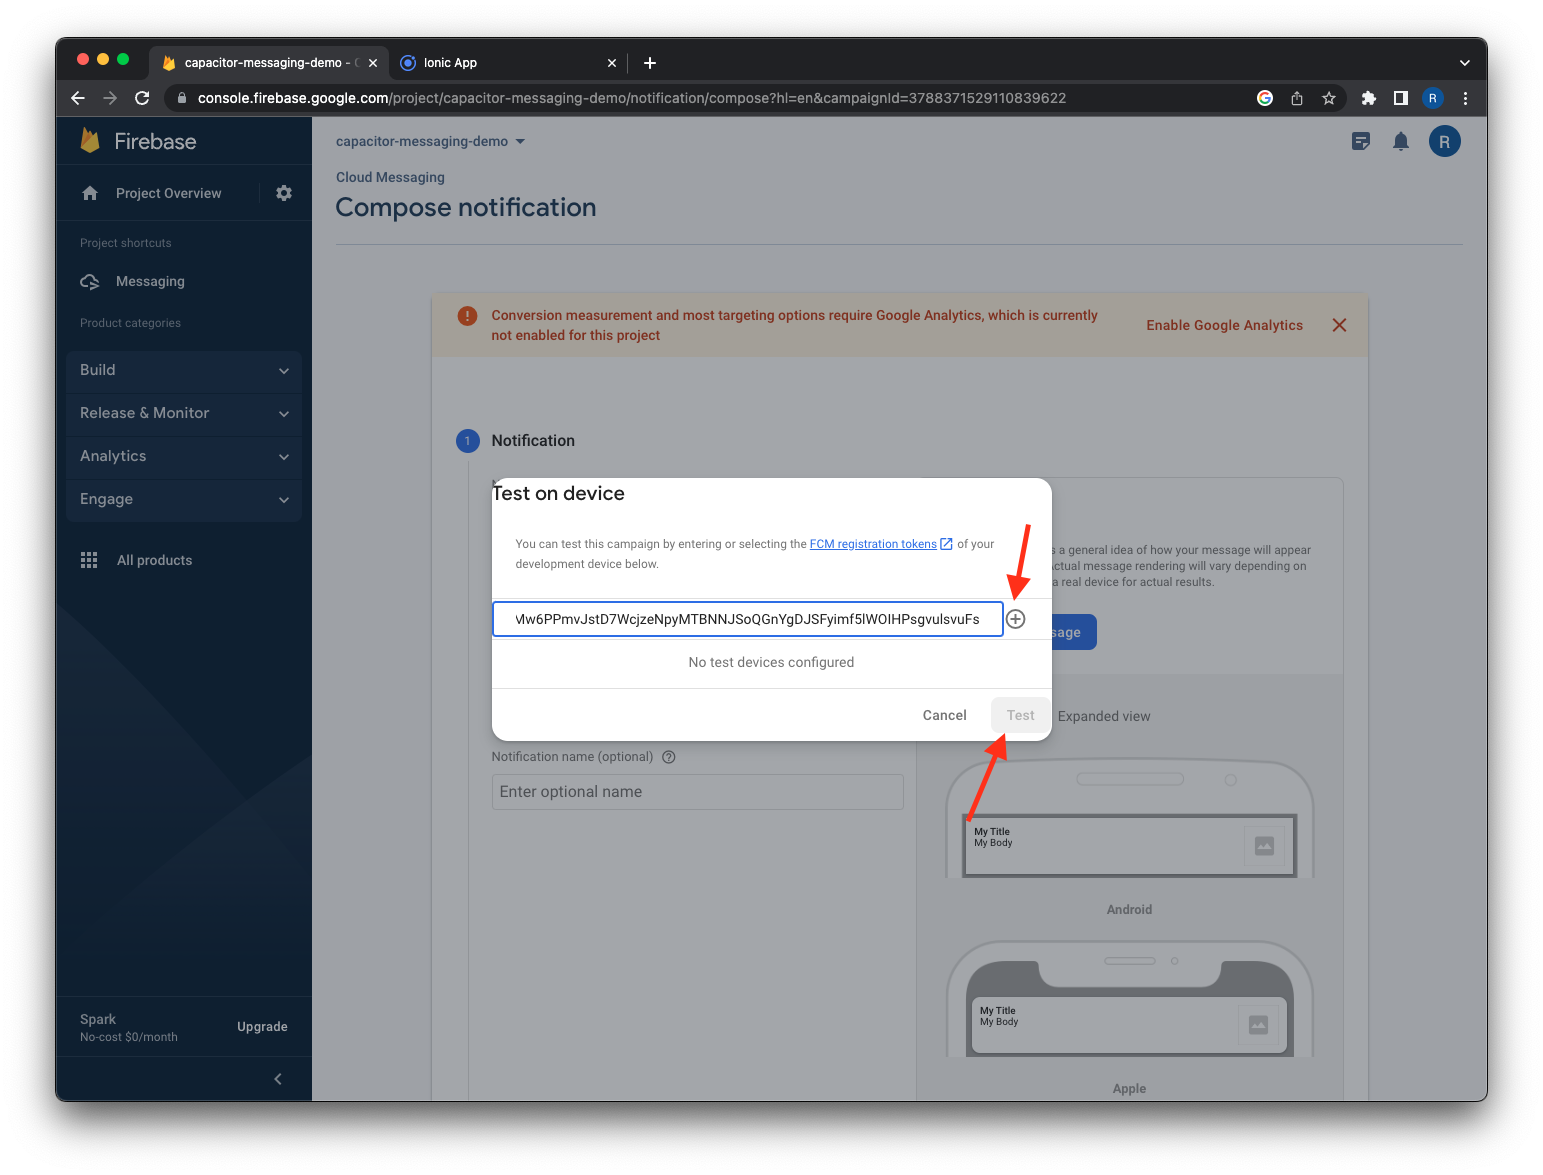
If you did everything correctly, your first notification will arrive. Congratulations!
### Firebase REST API[¶](#firebase-rest-api "Permanent link")
Firebase Cloud Messaging also provides a REST API. Take a look at the official Firebase documentation at [Send messages to specific devices](https://firebase.google.com/docs/cloud-messaging/send-message#send-messages-to-specific-devices#rest) to learn how you can send push notifications using it.
### Firebase Admin SDK[¶](#firebase-admin-sdk "Permanent link")
The [Firebase Admin SDK](https://firebase.google.com/docs/admin/setup) is available on different platforms and is used for the server-side integration of Firebase. Among other things, you can use it to send push notifications. We'll take a quick look at this using Node.js.
Before you can start with the implementation, you first need to generate a service account key. This key grants your application access to your Firebase project. Navigate to [Service accounts](https://console.firebase.google.com/project/%5F/settings/serviceaccounts/adminsdk) in the Project settings. Then click `Generate new private key` and `Generate key` to download the service account key.

Next, create an empty folder and initialize a new npm project:
`[](#%5F%5Fcodelineno-19-1)npm init
`
First install the Firebase Admin SDK:
`[](#%5F%5Fcodelineno-20-1)npm i firebase-admin
`
Now create a new file named `main.js` with the following content:
| main.js | |
| -------------------------------------------------------------------------------------------------------------------------------------------------------------------------------------------------------------------------------------------------------------------------------------------------------------------------------------------------------------------------------------------------------------------------------------------------------------------------------------------------------------------------------------------------------------------------------------------------------------------------------------------------------------------------------------------------------------------------------------------------------------------------------------------------------------------------------- | --------------------------------------------------------------------------------------------------------------------------------------------------------------------------------------------------------------------------------------------------------------------------------------------------------------------------------------------------------------------------------------------------------------------------------------------------------------------------------------------------------------------------------------------------------------------------------------------------------------------------------------------------------------------------------------------------------------------------------- |
| [ 1](#%5F%5Fcodelineno-21-1) [ 2](#%5F%5Fcodelineno-21-2) [ 3](#%5F%5Fcodelineno-21-3) [ 4](#%5F%5Fcodelineno-21-4) [ 5](#%5F%5Fcodelineno-21-5) [ 6](#%5F%5Fcodelineno-21-6) [ 7](#%5F%5Fcodelineno-21-7) [ 8](#%5F%5Fcodelineno-21-8) [ 9](#%5F%5Fcodelineno-21-9) [10](#%5F%5Fcodelineno-21-10) [11](#%5F%5Fcodelineno-21-11) [12](#%5F%5Fcodelineno-21-12) [13](#%5F%5Fcodelineno-21-13) [14](#%5F%5Fcodelineno-21-14) [15](#%5F%5Fcodelineno-21-15) [16](#%5F%5Fcodelineno-21-16) [17](#%5F%5Fcodelineno-21-17) [18](#%5F%5Fcodelineno-21-18) [19](#%5F%5Fcodelineno-21-19) [20](#%5F%5Fcodelineno-21-20) [21](#%5F%5Fcodelineno-21-21) [22](#%5F%5Fcodelineno-21-22) [23](#%5F%5Fcodelineno-21-23) [24](#%5F%5Fcodelineno-21-24) [25](#%5F%5Fcodelineno-21-25) [26](#%5F%5Fcodelineno-21-26) [27](#%5F%5Fcodelineno-21-27) | import { initializeApp, cert } from "firebase-admin/app"; import { getMessaging } from "firebase-admin/messaging"; initializeApp({ credential: cert("YOUR\_FIREBASE\_KEY\_PATH"), }); // This FCM token comes from the Capacitor Firebase Cloud Messaging plugin. const token \= "YOUR\_REGISTRATION\_TOKEN"; const message \= { notification: { title: "Capacitor Firebase Messaging", body: "Hello world!", }, token: token, }; // Send a message to the device corresponding to the provided FCM token getMessaging() .send(message) .then((response) \=> { console.log("Successfully sent message: ", response); }) .catch((error) \=> { console.log("Error sending message: ", error); }); |
Replace the placeholder `YOUR_FIREBASE_KEY_PATH` with the path to your service account key that you just downloaded from the Firebase Console. Replace the placeholder `YOUR_REGISTRATION_TOKEN` with the FCM token you get from the Capacitor Firebase Cloud Messaging plugin via the [getToken()](/docs/sdks/capacitor/firebase/cloud-messaging/#gettoken) method.
Now you can run the code and send a push notification using the Firebase Admin SDK:
`[](#%5F%5Fcodelineno-22-1)node main.js
`
More information about the Firebase Admin SDK can be found at [Add the Firebase Admin SDK to your server](https://firebase.google.com/docs/admin/setup).
Want to stay up to date with new Capacitor plugins and guides? Subscribe to the Capawesome newsletter.
[Subscribe to the Capawesome Newsletter](/newsletter/)
## FAQ[¶](#faq "Permanent link")
### Do I need a paid Apple Developer account just to test push notifications on iOS?[¶](#do-i-need-a-paid-apple-developer-account-just-to-test-push-notifications-on-ios "Permanent link")
Yes — this is a hard requirement, not something you can work around with a free Apple ID. Registering an App ID with the Push Notifications capability and generating an APNs key both require an active paid Apple Developer Program membership, so budget for that before starting the iOS portion of this setup.
### Why does my app show a blank notification icon on Android instead of my app icon?[¶](#why-does-my-app-show-a-blank-notification-icon-on-android-instead-of-my-app-icon "Permanent link")
Because Android renders push notification icons as white pixels on a transparent background, and most app icons aren't shaped that way — the result is usually a white square or circle instead of your actual icon. The fix is providing a dedicated notification icon (white-on-transparent) via the `com.google.firebase.messaging.default_notification_icon` meta-data entry, rather than relying on the default app icon.
### Can I test push notifications without writing any server-side code?[¶](#can-i-test-push-notifications-without-writing-any-server-side-code "Permanent link")
Yes — the Firebase Console's Messaging tab lets you send a test notification directly to a device using its FCM token, no backend required. Server-side sending (via the REST API or Firebase Admin SDK) only becomes necessary once you need to target notifications programmatically, like sending them in response to an event in your own backend.
### Does the FCM token stay the same for the lifetime of an app installation?[¶](#does-the-fcm-token-stay-the-same-for-the-lifetime-of-an-app-installation "Permanent link")
No — the FCM token can change over time, which is why the guide recommends requesting it at app start and syncing it to your server on every launch, rather than fetching it once and storing it as if it were permanent. Code that hardcodes or caches an old token indefinitely will eventually start failing to deliver notifications to that device.
### Do I need the `firebase-messaging-sw.js` service worker if I only care about foreground notifications on web?[¶](#do-i-need-the-firebase-messaging-swjs-service-worker-if-i-only-care-about-foreground-notifications-on-web "Permanent link")
No — the service worker is specifically for receiving notifications while the web app is in the background or the browser tab isn't focused. If you only need notifications to work while your app is actively open and focused, you can skip adding the service worker file entirely.
## Conclusion[¶](#conclusion "Permanent link")
Adding push notifications to an app can be a real challenge depending on the platform: Android makes it easiest for the developer, and iOS even requires a paid developer account. Thanks to the [Capacitor Firebase Cloud Messaging plugin](/docs/sdks/capacitor/firebase/cloud-messaging/), once configured you get a single API for Android, iOS, and web.
**Resources:**
* [Demo app on GitHub](https://github.com/capawesome-team/ionic-capacitor-firebase-messaging-demo)
* [API Reference](/docs/sdks/capacitor/firebase/cloud-messaging/#api)
* Troubleshooting [Android](/blog/troubleshooting-capacitor-android-issues/)
* Troubleshooting [iOS](/blog/troubleshooting-capacitor-ios-issues/)
For questions and community support, join the [Capawesome Discord server](https://discord.gg/VCXxSVjefW), and subscribe to the [Capawesome newsletter](/newsletter/) to stay updated on the latest news.
July 17, 2026
Back to top
```json
{
"@context": "https://schema.org",
"@type": "BlogPosting",
"headline": "Capacitor Push Notifications: The Complete Guide",
"description": "Add push notifications to your Ionic Capacitor app on Android, iOS and web using the Firebase Cloud Messaging plugin. Step-by-step guide with FCM.",
"image": "https://capawesome.io/assets/banners/cloud-build-and-deploy-capacitor-apps.png",
"datePublished": "2023-04-07T00:00:00+00:00",
"dateModified": "2026-07-17T00:00:00+00:00",
"author": [
{
"@type": "Person",
"name": "Robin Genz",
"url": "https://github.com/robingenz"
}
],
"publisher": {
"@type": "Organization",
"name": "Capawesome",
"url": "https://capawesome.io",
"logo": {
"@type": "ImageObject",
"url": "https://capawesome.io/assets/images/logo.svg"
}
},
"articleSection": "Capacitor",
"keywords": ["Capacitor", "Firebase", "Guides", "SDKs"],
"isPartOf": {
"@type": "Blog",
"@id": "https://capawesome.io/blog/#blog"
},
"mainEntityOfPage": "https://capawesome.io/blog/capacitor-push-notifications-guide/",
"url": "https://capawesome.io/blog/capacitor-push-notifications-guide/"
}
{
"@context": "https://schema.org",
"@type": "BreadcrumbList",
"itemListElement": [
{
"@type": "ListItem",
"position": 1,
"name": "Home",
"item": "https://capawesome.io/"
},
{
"@type": "ListItem",
"position": 2,
"name": "Blog",
"item": "https://capawesome.io/blog/"
},
{
"@type": "ListItem",
"position": 3,
"name": "Capacitor Push Notifications: The Complete Guide",
"item": "https://capawesome.io/blog/capacitor-push-notifications-guide/"
}
]
}
{"@context": "https://schema.org", "@type": "FAQPage", "mainEntity": [{"@type": "Question", "name": "Why Firebase?", "acceptedAnswer": {"@type": "Answer", "text": "With Firebase, Google offers a great mobile platform that lets you build high-quality apps very quickly and efficiently. Firebase Cloud Messaging is the cross-platform messaging solution that lets you reliably send messages at no cost. Firebase has a large community and SDKs that work well in Capacitor; we also offer a Cloud Firestore plugin for native database access alongside Cloud Messaging."}}, {"@type": "Question", "name": "Do I need a paid Apple Developer account just to test push notifications on iOS?", "acceptedAnswer": {"@type": "Answer", "text": "Yes — this is a hard requirement, not something you can work around with a free Apple ID. Registering an App ID with the Push Notifications capability and generating an APNs key both require an active paid Apple Developer Program membership, so budget for that before starting the iOS portion of this setup."}}, {"@type": "Question", "name": "Why does my app show a blank notification icon on Android instead of my app icon?", "acceptedAnswer": {"@type": "Answer", "text": "Because Android renders push notification icons as white pixels on a transparent background, and most app icons aren't shaped that way — the result is usually a white square or circle instead of your actual icon. The fix is providing a dedicated notification icon (white-on-transparent) via the com.google.firebase.messaging.default_notification_icon meta-data entry, rather than relying on the default app icon."}}, {"@type": "Question", "name": "Can I test push notifications without writing any server-side code?", "acceptedAnswer": {"@type": "Answer", "text": "Yes — the Firebase Console's Messaging tab lets you send a test notification directly to a device using its FCM token, no backend required. Server-side sending (via the REST API or Firebase Admin SDK) only becomes necessary once you need to target notifications programmatically, like sending them in response to an event in your own backend."}}, {"@type": "Question", "name": "Does the FCM token stay the same for the lifetime of an app installation?", "acceptedAnswer": {"@type": "Answer", "text": "No — the FCM token can change over time, which is why the guide recommends requesting it at app start and syncing it to your server on every launch, rather than fetching it once and storing it as if it were permanent. Code that hardcodes or caches an old token indefinitely will eventually start failing to deliver notifications to that device."}}, {"@type": "Question", "name": "Do I need the firebase-messaging-sw.js service worker if I only care about foreground notifications on web?", "acceptedAnswer": {"@type": "Answer", "text": "No — the service worker is specifically for receiving notifications while the web app is in the background or the browser tab isn't focused. If you only need notifications to work while your app is actively open and focused, you can skip adding the service worker file entirely."}}], "url": "https://capawesome.io/blog/capacitor-push-notifications-guide/"}
```